1. 스프링 MVC 동작 원리
ㅇ 스프링 MVC로 웹 애플리케이션 개발하기
M: 모델 V: 뷰 C: 컨트롤러
모델: 평범한 자바 객체 POJO (POJO와 Bean의 차이점 : sanghye.tistory.com/13)
뷰: HTML. JSP, 타임리프 , ...
컨트롤러: 스프링 @MVC
모델: 도메인 객체 또는 DTO로 화면에 전달할 또는 화면에서 전달 받은 데이터를 담고 있는 객체.
뷰: 데이터를 보여주는 역할. 다양한 형태로 보여줄 수 있다. HTML, JSON, XML, ...
컨트롤러: 사용자 입력을 받아 모델 객체의 데이터를 변경하거나, 모델 객체를 뷰에 전달하는 역할.
입력값 검증 - 입력 받은 데이터로 모델 객체 변경 - 변경된 모델 객체를 뷰에 전달
MVC 패턴의 장점
● 동시 다발적(Simultaneous) 개발 - 백엔드 개발자와 프론트엔드 개발자가 독립적으로 개발을 진행할 수 있다.
● 높은 결합도 - 논리적으로 관련있는 기능을 하나의 컨트롤러로 묶거나, 특정 모델과 관련있는 뷰를 그룹화 할 수 있다.
● 낮은 의존도 - 뷰, 모델, 컨트롤러는 각각 독립적이다.
● 개발 용이성 - 책임이 구분되어 있어 코드 수정하는 것이 편하다.
● 한 모델에 대한 여러 형태의 뷰를 가질 수 있다.
MVC 패턴의 단점
● 코드 네비게이션 복잡함
● 코드 일관성 유지에 노력이 필요함
● 높은 학습 곡선
참고
● https://en.wikipedia.org/wiki/Model%E2%80%93view%E2%80%93controller
● https://www.thymeleaf.org/doc/tutorials/2.1/usingthymeleaf.html
2. 서블릿 소개
ㅇ 가장 기본적인 서블릿 애플리케이션 만들기
서블릿 (Servlet)
● 자바 엔터프라이즈 에디션은 "웹 애플리케이션 개발용 스팩과 API 제공"
● 요청 당 쓰레드 (만들거나, 풀에서 가져다가 ) 사용 (프로세스가 떠서 쓰레드로 처리함)
● 그 중에 가장 중요한 클래스중 하나가 HttpServlet.
서블릿 등장 이전에 사용하던 기술인 CGI (Common Gateway Interface)
● 요청 당 프로세스를 만들어 사용
서블릿의 장점 (CGI에 비해)
● 빠르다.
● 플랫폼 독립적
● 보안
● 이식성
서블릿 엔진 또는 서블릿 컨테이너 (톰캣, 제티, 언더토, ...)
● 세션 관리
● 네트워크 서비스
● MIME 기반 메시지 인코딩 디코딩
● 서블릿 생명주기 관리
서블릿 생명주기
● 서블릿 컨테이너가 서블릿 인스턴스의 init() 메소드를 호출하여 초기화 한다.
- 최초 요청을 받았을 때 한번 초기화 하고 나면 그 다음 요청부터는 이 과정을 생략한다.
● 서블릿이 초기화 된 다음부터 클라이언트의 요청을 처리할 수 있다. 각 요청은 별도의
쓰레드로 처리하고 이때 서블릿 인스턴스의 service() 메소드를 호출한다.
- 이 안에서 HTTP 요청을 받고 클라이언트로 보낼 HTTP 응답을 만든다.
- service()는 보통 HTTP Method에 따라 doGet(), doPost() 등으로 처리를 위임한다.
- 따라서 보통 doGet() 또는 doPost()를 구현한다.
● 서블릿 컨테이너 판단에 따라 해당 서블릿을 메모리에서 내려야 할 시점에 destroy()를 호출한다.
3. 서블릿 애플리케이션 개발
public class HelloServlet extends HttpServlet {

@Override public void init() throws ServletException {
System. out .println( "init" ); }

@Override protected void doGet(HttpServletRequest req, HttpServletResponse resp) throws ServletException, IOException {
System. out .println( "doGet" ); resp.getWriter().write( "Hello Servlet" ); }

@Override public void destroy() {
System. out .println( "destroy" ); } }
<!DOCTYPE web-app PUBLIC "-//Sun Microsystems, Inc.//DTD Web Application 2.3//EN" "http://java.sun.com/dtd/web-app_2_3.dtd" >
< web-app >
< display-name > Archetype Created Web Application </ display-name >
< servlet >
< servlet-name > hello </ servlet-name > < servlet-class > me.whiteship.HelloServlet </ servlet-class > </ servlet >
< servlet-mapping >
< servlet-name > hello </ servlet-name > < url-pattern > /hello </ url-pattern > </ servlet-mapping > </ web-app >
4. 서블릿 리스너와 필터
ㅇ 서블릿 리스너
● 웹 애플리케이션에서 발생하는 주요 이벤트를 감지하고 각 이벤트에 특별한 작업이 필요한 경우에 사용할 수 있다.
○ 서블릿 컨텍스트 수준의 이벤트
■ 컨텍스트 라이프사이클 이벤트
■ 컨텍스트 애트리뷰트 변경 이벤트
○ 세션 수준의 이벤트
■ 세션 라이프사이클 이벤트
■ 세션 애트리뷰트 변경 이벤트
ㅇ 서블릿 필터
● 들어온 요청을 서블릿으로 보내고, 또 서블릿이 작성한 응답을 클라이언트로 보내기 전에 특별한 처리가 필요한 경우에 사용할 수 있다.
<!DOCTYPE web-app PUBLIC
 "-//Sun Microsystems, Inc.//DTD Web Application 2.3//EN"
 "http://java.sun.com/dtd/web-app_2_3.dtd" >

<web-app>
  <display-name>Archetype Created Web Application</display-name>

    <servlet>
      <servlet-name>hello</servlet-name>
      <servlet-class>servlet.HelloServlet</servlet-class>
    </servlet>

    <servlet-mapping>
      <servlet-name>hello</servlet-name>
      <url-pattern>/hello</url-pattern>
    </servlet-mapping>

  <filter>
    <filter-name>myFilter</filter-name>
    <filter-class>servlet.MyFilter</filter-class>
  </filter>

  <filter-mapping>
    <filter-name>myFilter</filter-name>
    <servlet-name>hello</servlet-name>
  </filter-mapping>

  <listener>
    <listener-class>servlet.MyListener</listener-class>
  </listener>

</web-app>
package servlet;
import javax.servlet.*;
import java.io.IOException;
public class MyFilter implements Filter {
@Override
public void init(FilterConfig filterConfig) throws ServletException {
System.out.println("Filter Init");
}
@Override
public void doFilter(ServletRequest servletRequest, ServletResponse servletResponse, FilterChain filterChain) throws IOException, ServletException {
System.out.println("Filter");
filterChain.doFilter(servletRequest,servletResponse); // 요청 응답을 필터 체인으로 연결을 해줘야 함 (마지막 필터는 서블릿에 연결됨)
}
@Override
public void destroy() {
System.out.println("Filter Destroy");
}
}
package servlet;

import javax.servlet.ServletContextEvent;
import javax.servlet.ServletContextListener;

public class MyListener implements ServletContextListener {
    @Override
    public void contextInitialized(ServletContextEvent sce) {
        System.out.println("Context Initialized");
        sce.getServletContext().setAttribute("name", "h232ch");
    }

    @Override
    public void contextDestroyed(ServletContextEvent sce) {
        System.out.println("Context Destroyed");

    }
}
● 체인 형태의 구조
참고
● https://docs.oracle.com/cd/B14099_19/web.1012/b14017/filters.htm#i1000654
(출처: https://docs.spring.io/spring/docs/current/spring-framework-reference/web.html#mvc )
ㅇ 서블릿 애플리케이션에 스프링 연동하기
● 서블릿에서 스프링이 제공하는 IoC 컨테이너 활용하는 방법
<!DOCTYPE web-app PUBLIC
 "-//Sun Microsystems, Inc.//DTD Web Application 2.3//EN"
 "http://java.sun.com/dtd/web-app_2_3.dtd" >

<web-app>
  <display-name>Archetype Created Web Application</display-name>


  <context-param>
    <param-name>contextClass</param-name>
    <param-value>org.springframework.web.context.support.AnnotationConfigWebApplicationContext</param-value>
  </context-param>

  <context-param>
    <param-name>contextConfigLocation</param-name>
    <param-value>servlet.AppConfig</param-value>
  </context-param>

  <!--  Spring IoC 컨테이너를 리스너가 적용하는데 적용시 Spring IoC 컨테이너는 Context-param을 참조하여 생성된다. -->
  <!--  servlet.AppConfig 파일의 설정을 참조하여 생성 -->

  <listener>
    <listener-class>org.springframework.web.context.ContextLoaderListener</listener-class>
  </listener>
<!--  Spring IoC 컨테이너를 서블릿 애플리케이션의 생명주기에 맞추어 바인딩 해주는 코드 -->
<!--  서블릿 초기화시 Spring IoC 컨테이너를 연동해주고 종료시 연동을 종료 시켜줌 -->
<!--  Root WebApplicationContext를 통해 서블릿 디스페처가 생성됨 (Service, Repository..) !-->


  <servlet>
    <servlet-name>app</servlet-name>
    <servlet-class>org.springframework.web.servlet.DispatcherServlet</servlet-class>
    <init-param>
      <param-name>contextClass</param-name>
      <param-value>org.springframework.web.context.support.AnnotationConfigWebApplicationContext</param-value>
    </init-param>
    <init-param>
      <param-name>contextConfigLocation</param-name>
      <param-value>servlet.WebConfig</param-value>
    </init-param>
<!--    자바 설정을 사용하려면 설정해야 함-->
<!--  Root WebApplicationContext를 상속받은 Servlet WebApplicationContext
통해 서블릿 디스페처가 생성됨 (Controller, View, Resolver..) !-->
  </servlet>

  <servlet-mapping>
    <servlet-name>app</servlet-name>
    <url-pattern>/app/*</url-pattern>
  </servlet-mapping>
</web-app>
● 스프링이 제공하는 서블릿 구현체 DispatcherServlet 사용하기
ㅇ ContextLoaderListener
● 서블릿 리스너 구현체
● ApplicationContext를 만들어 준다.
● ApplicationContext를 서블릿 컨텍스트 라이프사이클에 따라 등록하고 소멸시켜준다.
● 서블릿에서 IoC 컨테이너를 ServletContext를 통해 꺼내 사용할 수 있다.
docs.spring.io/spring/docs/current/spring-framework-reference/web.html#mvc
5. 스프링 IoC 컨테이너 연동
(출처: https://docs.spring.io/spring/docs/current/spring-framework-reference/web.html#mvc )
ㅇ 서블릿 애플리케이션에 스프링 연동하기
● 서블릿에서 스프링이 제공하는 IoC 컨테이너 활용하는 방법
● 스프링이 제공하는 서블릿 구현체 DispatcherServlet 사용하기
ㅇ DispatcherServlet
● 스프링 MVC의 핵심.
● Front Controller 역할을 한다.
ㅇ 참고
● http://www.corej2eepatterns.com/FrontController.htm
● https://www.oracle.com/technetwork/java/frontcontroller-135648.html
● https://martinfowler.com/eaaCatalog/frontController.html
6. 스프링 MVC 연동
ㅇ DispatcherServlet 동작 원리 1부
DispatcherServlet 초기화
● 다음의 특별한 타입의 빈들을 찾거나, 기본 전략에 해당하는 빈들을 등록한다.
● HandlerMapping: 핸들러를 찾아주는 인터페이스
● HandlerAdapter: 핸들러를 실행하는 인터페이스
● HandlerExceptionResolver
● ViewResolver
● ...
ㅇ DispatcherServlet 동작 순서
- 요청을 분석한다. (로케일, 테마, 멀티파트 등)
- (핸들러 맵핑에게 위임하여) 요청을 처리할 핸들러를 찾는다.
- (등록되어 있는 핸들러 어댑터 중에) 해당 핸들러를 실행할 수 있는 “핸들러 어댑터”를 찾는다.
- 찾아낸 “핸들러 어댑터”를 사용해서 핸들러의 응답을 처리한다.
● 핸들러의 리턴값을 보고 어떻게 처리할지 판단한다.
● 뷰 이름에 해당하는 뷰를 찾아서 모델 데이터를 랜더링한다. // Return 값이 String인 경우
● @ResponseEntity가 있다면 Converter를 사용해서 응답 본문을 만들고. // ResponseEntity의 경우 응답 본문을 만듦
5. (부가적으로) 예외가 발생했다면, 예외 처리 핸들러에 요청 처리를 위임한다. // Exception 처리
6. 최종적으로 응답을 보낸다.
HandlerMapping
● RequestMappingHandlerMapping
HandlerAdapter
● RequestMappingHandlerAdapter
7. DispatcherServlet 동작 원리 2부: SimpleController
ㅇ HandlerMapping
● BeanNameUrlHandlerMapping
ㅇ HandlerAdapter
● SimpleControllerHandlerAdapter
@org.springframework.stereotype.Controller ( "/simple" )
public class SimpleController implements Controller {
@Override
public ModelAndView handleRequest(HttpServletRequest request, HttpServletResponse response) throws Exception {
return new ModelAndView( "/WEB-INF/simple.jsp" ); } }
8. DispatcherServlet 동작 원리 3부: 커스텀 ViewResolver
ㅇ ViewResolver
● InternalResourceViewResolver
ㅇ InternalResourceViewResolver
● Prefix
● Suffix
@Configuration @ComponentScan public class WebConfig {
@Bean public InternalResourceViewResolver viewResolver() {
InternalResourceViewResolver viewResolver = new InternalResourceViewResolver(); viewResolver.setPrefix( "/WEB-INF/" ); viewResolver.setSuffix( ".jsp" ); return viewResolver; }
}
@org.springframework.stereotype.Controller( "/simple" )
public class SimpleController implements Controller {
@Override public ModelAndView handleRequest(HttpServletRequest request, HttpServletResponse response) throws Exception {
return new ModelAndView( "/WEB-INF/simple.jsp" ); } }
ㅇ DispatcherSerlvet의 기본 전략
● DispatcherServlet.properties
ㅇMultipartResolver
● 파일 업로드 요청 처리에 필요한 인터페이스
● HttpServletRequest를 MultipartHttpServletRequest로 변환해주어 요청이 담고 있는 File을 꺼낼 수 있는 API 제공.
ㅇLocaleResolver
● 클라이언트의 위치(Locale) 정보를 파악하는 인터페이스
● 기본 전략은 요청의 accept-language를 보고 판단.
ㅇThemeResolver
● 애플리케이션에 설정된 테마를 파악하고 변경할 수 있는 인터페이스
● 참고: https://memorynotfound.com/spring-mvc-theme-switcher-example/
ㅇHandlerMapping
● 요청을 처리할 핸들러를 찾는 인터페이스
9. 스프링 MVC 구성 요소
ㅇ HandlerAdapter
● HandlerMapping이 찾아낸 “핸들러”를 처리하는 인터페이스
● 스프링 MVC 확장력의 핵심
ㅇ HandlerExceptionResolver
● 요청 처리 중에 발생한 에러를 처리하는 인터페이스
ㅇ RequestToViewNameTranslator
● 핸들러에서 뷰 이름을 명시적으로 리턴하지 않은 경우, 요청을 기반으로 뷰 이름을 판단하는 인터페이스
ㅇ ViewResolver
● 뷰 이름(string)에 해당하는 뷰를 찾아내는 인터페이스
ㅇ FlashMapManager
● FlashMap 인스턴스를 가져오고 저장하는 인터페이스
● FlashMap은 주로 리다이렉션을 사용할 때 요청 매개변수를 사용하지 않고 데이터를 전달하고 정리할 때 사용한다.
● redirect:/events
10. 스프링 MVC 동작원리 정리
결국엔 (굉장히 복잡한) 서블릿. = DispatcherServlet
DispatcherServlet 초기화
1. 특정 타입에 해당하는 빈을 찾는다.
2. 없으면 기본 전략을 사용한다. (DispatcherServlet.properties)
ㅇ 스프링 부트 사용하지 않는 스프링 MVC
● 서블릿 컨네이너(ex, 톰캣)에 등록한 웹 애플리케이션(WAR)에 DispatcherServlet을 등록한다.
○ web.xml에 서블릿 등록
○ 또는 WebApplicationInitializer에 자바 코드로 서블릿 등록 (스프링 3.1+, 서블릿 3.0+)
● 세부 구성 요소는 빈 설정하기 나름.
ㅇ 스프링 부트를 사용하는 스프링 MVC
● 자바 애플리케이션에 내장 톰캣을 만들고 그 안에 DispatcherServlet을 등록한다.
○ 스프링 부트 자동 설정이 자동으로 해줌.
● 스프링 부트의 주관에 따라 여러 인터페이스 구현체를 빈으로 등록한다.
2부. 스프링 MVC 설정
11. 스프링 MVC 구성 요소 직접 빈으로 등록하기
@Configuration을 사용한 자바 설정 파일에 직접 @Bean을 사용해서 등록하기
12. @EnableWebMvc
ㅇ 애노테이션 기반 스프링 MVC를 사용할 때 편리한 웹 MVC 기본 설정
@Configuration @EnableWebMvc public class WebConfig { }
ㅇ WebMvcConfigurer 인터페이스
@EnableWebMvc가 제공하는 빈을 커스터마이징할 수 있는 기능을 제공하는 인터페이스
@Configuration
@EnableWebMvc
public class WebConfig implements WebMvcConfigurer {
@Override public void configureViewResolvers(ViewResolverRegistry registry) {
registry.jsp( "/WEB-INF/" , ".jsp" ); } }
ㅇ 스프링 부트의 “주관”이 적용된 자동 설정이 동작한다.
● JSP 보다 Thymeleaf 선호
● JSON 지원
● 정적 리소스 지원 (+ 웰컴 페이지, 파비콘 등 지원)
ㅇ 스프링 MVC 커스터마이징
● application.properties
● @Configuration + Implements WebMvcConfigurer: 스프링 부트의 스프링 MVC 자동설정 + 추가 설정
● @Configuration + @EnableWebMvc + Imlements WebMvcConfigurer : 스프링 부트의 스프링 MVC 자동설정 사용하지 않음. (비추)
13. 스프링 부트의 스프링 MVC 설정
ㅇ 포매터 추가하기
https://docs.spring.io/spring-framework/docs/current/javadoc-api/org/springframework/web/servlet/config/annotation/WebMvcConfigurer.html#addFormatters-org.springframework.format.Forma tterRegistry-Formatter
● Printer: 해당 객체를 (Locale 정보를 참고하여) 문자열 로 어떻게 출력할 것인가
● Parser: 어떤 문자열 을 (Locale 정보를 참고하여) 객체로 어떻게 변환할 것인가
https://docs.spring.io/spring-framework/docs/current/javadoc-api/org/springframework/format/Formatter.html
ㅇ 포매터 추가하는 방법 1
● WebMvcConfigurer의 addFormatters(FormatterRegistry) 메소드 정의
ㅇ 포매터 추가하는 방법 2 (스프링 부트 사용시에만 가능 함)
● 해당 포매터를 빈으로 등록
WevMvcConfiguer 설정
package spring20.demo;

import org.springframework.context.annotation.Bean;
import org.springframework.context.annotation.Configuration;
import org.springframework.format.FormatterRegistry;
import org.springframework.http.CacheControl;
import org.springframework.http.converter.HttpMessageConverter;
import org.springframework.oxm.jaxb.Jaxb2Marshaller;
import org.springframework.web.servlet.config.annotation.InterceptorRegistry;
import org.springframework.web.servlet.config.annotation.ResourceHandlerRegistry;
import org.springframework.web.servlet.config.annotation.ViewControllerRegistry;
import org.springframework.web.servlet.config.annotation.WebMvcConfigurer;

import java.util.List;
import java.util.concurrent.TimeUnit;

@Configuration
public class WebConfig implements WebMvcConfigurer { // Springboot WebMvc는 WebConfig 클래스의 설정값을 참조하여 서비스를 띄움

    @Override
    public void addFormatters(FormatterRegistry registry) {
        registry.addFormatter(new PersonFormatter()); // Person Formatter 정보를 넣어줌
        // 스프링 부트에서는 위 설정이 필요없음, Formatter<Person>과 같이 Formatter로 등록되어있다면 알아서 Formatter에 넣어줌
        // 위와 같이 하기위해서는 PersonFormatter를 빈으로 등록해야 함 -> @Component
    }   // 단 위 설정시 테스트는  깨지는데 테스트에서 사용되는 WebMvcTest는 Web과 관련된 빈만 등록하기 때문이다
          // @Configuration의 경우 웹으로 인식 -> @Component의 경우 웹으로 인식하지 않음 (매우 중요한 부분)
          // PersonFormatter는 @Component로 등록했기 때문에 WebMvcTest에서 빈으로 등록하지 않아 Formatter로 등록안됨

              }
}
Person 객체
package spring20.demo;


public class Person {
    private String name;

    @Override
    public String toString() {
        return "Person{" +
                "name='" + name + '\'' +
                '}';
    }

    public String getName() {
        return name;
    }

    public void setName(String name) {
        this.name = name;
    }
}
SimpleController.java (name을 PathVariable로 받아서 name에 저장하고 Return함)
package spring20.demo;

import org.springframework.web.bind.annotation.*;

@RestController
public class SampleController {

   @GetMapping("/hello2/{name}")
    public String hello2(@PathVariable("name") Person person){ // url path의 name 문자열을 객체 person으로 받는다.
        return "hello " + person.getName(); // name은 PersonFormatter로 가서 Person 객체를 뱉는다. 이후 해당 객체로 getName함
        // PersonFormatter의 설정은 WebConfig에 Formatter 설정을 기재하여 진행하고 SpringBoot WebMvc에서는 Formatter설정을 추가하여 실행함

    }

    @GetMapping("/hello3")
    public String hello3(@RequestParam("name") Person person){ //
        return "hello " + person.getName(); // http://localhost:8080/hello3?name=hi 가능
    }
}
PersonFormatter.java
package spring20.demo;

import org.springframework.format.Formatter;
import org.springframework.stereotype.Component;

import java.text.ParseException;
import java.util.Locale;

@Component
public class PersonFormatter implements Formatter<Person> { // 파써는 문자를 객체로 변환, 프린트는 객체를 문자로 변환
    @Override
    public Person parse(String s, Locale locale) throws ParseException {
        Person person = new Person();
        person.setName(s);
        return person;
    }

    @Override
    public String print(Person person, Locale locale) {
        return person.toString();
    }
}
14. 도메인 클래스 컨버터 자동 등록
스프링 데이터 JPA는 스프링 MVC용 도메인 클래스 컨버터를 제공합니다.
ㅇ 도메인 클래스 컨버터
● 스프링 데이터 JPA가 제공하는 Repository를 사용해서 ID에 해당하는 엔티티를 읽어옵니다.
ㅇ 의존성 설정 : com.h2database
ㅇ 엔티티 맵핑
@Entity public class Person {
@Id @GeneratedValue private Integer id ; }
ㅇ 레파시토리 추가
public interface PersonRepository extends JpaRepository<Person, Integer> { } 테스트 코드 수정
● 테스트용 이벤트 객체 생성
● 이벤트 리파지토리에 저장
● 저장한 이벤트의 ID로 조회 시도
Person2 객체 (Entity)
package spring20.demo;

import javax.persistence.Entity;
import javax.persistence.GeneratedValue;
import javax.persistence.Id;

@Entity
public class Person2 {

    @Id @GeneratedValue // JPA에서 제공하는 ID 포메터 기능을 이용하고 DB 기록시 자동으로 ID를 생성해줌
    private Long id;
    private String name;

    public Long getId() {
        return id;
    }

    public void setId(Long id) {
        this.id = id;
    }

    public String getName() {
        return name;
    }

    public void setName(String name) {
        this.name = name;
    }
}
PersonRepository.java
package spring20.demo;

import org.springframework.data.jpa.repository.JpaRepository;

public interface PersonRepository extends JpaRepository<Person2, Long> {
    // ID으로 객체를 컨버팅하는 용도로 사용하는 JPA 레파시토리 생성
    // 도메인 클래스의 경우 JPA가 컨버팅(Formatter의 역할)을 자동으로 설정해줌 즉 -> 별도의 Formatter 설정없이 ID를 Prameter로 받아서 객체로 처리 가능
    // JpaRepository에는 기본적으로 findById, findAll 등의 기능이 존재함 -> 들어가서 확인
}
SImpleController.java
package spring20.demo;

import org.springframework.web.bind.annotation.*;

@RestController
public class SampleController {

@GetMapping("/hello4")
    public String hello4(@RequestParam("id") Person2 person2){ // 값을 id로 받는 경우 별도의 Formatter를 작성할 필요 없음 -> DATA JPA의 도움을 받음
        // JPA가 제공하는 기능중 도메인 클래스 컨버터를 사용 -> pom.xml에 jpa 의존성 추가
        // 스프링 테이터 JPA가 제공하는 Repository를 사용해서 ID에 해당하는 엔티티를 읽어옴
        return "hello " + person2.getName();
    }

}
SimpleController.java
package spring20.demo;

import com.fasterxml.jackson.databind.ObjectMapper;
import org.hamcrest.Matchers;
import org.junit.Test;
import org.junit.runner.RunWith;
import org.springframework.beans.factory.annotation.Autowired;
import org.springframework.boot.test.autoconfigure.web.servlet.AutoConfigureMockMvc;
import org.springframework.boot.test.autoconfigure.web.servlet.WebMvcTest;
import org.springframework.boot.test.context.SpringBootTest;
import org.springframework.http.HttpHeaders;
import org.springframework.http.MediaType;
import org.springframework.test.context.junit4.SpringRunner;
import org.springframework.test.web.servlet.MockMvc;

import javax.print.attribute.standard.Media;
import javax.xml.bind.Marshaller;

import static org.springframework.test.web.servlet.request.MockMvcRequestBuilders.get;
import static org.springframework.test.web.servlet.result.MockMvcResultHandlers.print;
import static org.springframework.test.web.servlet.result.MockMvcResultMatchers.*;


@RunWith(SpringRunner.class) // Junit을 상속받는 러너 클래스
//@WebMvcTest // 웹만 테스트하는 슬라이싱 테스트 -> Mocking이 가능하게 함
// WebConfig에 PersonFormatter add 설정이 빠지면 테스트가
// 깨지는데 테스트에서 사용되는 WebMvcTest는 Web과 관련된 빈만 등록하기 때문이다
// WebConfig의 @Configuration의 경우 웹으로 인식 -> @Component의 경우 웹으로 인식하지 않음 (매우 중요한 부분)
// PersonFormatter는 @Component로 등록했기 때문에 WebMvcTest에서 빈으로 등록하지 않아 Formatter로 등록안됨
// 하여 아래와 같이 설정해야 함
@SpringBootTest
@AutoConfigureMockMvc // WebMvcTest에는 자동으로 들어가지만 SpringBootTest에서는 넣어줘야 함
public class SampleControllerTest {


    @Autowired
    MockMvc mockMvc;

    @Autowired
    PersonRepository personRepository;

    @Autowired
    PersonRepository3 personRepository3;


    @Test
    public void hello() throws Exception {
        this.mockMvc.perform(get("/hello2/h232ch"))
                .andDo(print())
                .andExpect(content().string("hello h232ch"));
    }

    @Test
    public void hello3() throws Exception {
        this.mockMvc.perform(get("/hello3")
                    .param("name", "h232ch")) // pram 의미 /hello3/name=h232ch
                .andDo(print())
                .andExpect(content().string("hello h232ch"));
    }

    @Test
    public void hello4() throws Exception {

        Person2 person2 = new Person2();
        person2.setName("h232ch");
        Person2 savedPerson = personRepository.save(person2);// DATA JPA에서 제공하는 기능

        this.mockMvc.perform(get("/hello4")
                .param("id", savedPerson.getId().toString())) // pram은 문자열만 넘겨줄 수 있기 때문에 toString으로 문자열화 처리
                .andDo(print())
                .andExpect(content().string("hello h232ch"));
    }


    @Test
    public void hello5() throws Exception {

        Person3 person3 = new Person3();
        person3.setName("h232ch");
        Person3 savedPerson = personRepository3.save(person3);

        this.mockMvc.perform(get("/hello5")
                .param("id", savedPerson.getId().toString()))
                .andDo(print())
                .andExpect(content().string("hello h232ch"));
    }


    @Test
    public void helloStatic() throws Exception {
        this.mockMvc.perform(get("/index.html"))
                .andDo(print())
                .andExpect(status().isOk())
                .andExpect(content().string(Matchers.containsString("Hello Index")));
    }


    @Test
    public void mobileStatic() throws Exception {
        this.mockMvc.perform(get("/mobile/index.html"))
                .andDo(print())
                .andExpect(status().isOk())
                .andExpect(content().string(Matchers.containsString("Hello Mobile")))
                .andExpect(header().exists(HttpHeaders.CACHE_CONTROL)); // 헤더에 캐시 컨트롤이 들어 있어야 함
    }

    @Test
    public void bodyTest() throws Exception{

        this.mockMvc.perform(get("/message")
                .content("hello"))
                .andDo(print())
                .andExpect(status().isOk())
                .andExpect(content().string("hello"));

    }

    @Autowired
    ObjectMapper objectMapper; // Jackson이 제공하는 ObjectMapper


    @Test
    public void jsonTest() throws Exception{

        Person2 person = new Person2();
        person.setId(2019l);
        person.setName("h232ch");
        String jsonString = objectMapper.writeValueAsString(person);

        this.mockMvc.perform(get("/jsonMessage")
                    .contentType(MediaType.APPLICATION_JSON_UTF8) // 본문에 Json을 담아서 보낼거고
                    .accept(MediaType.APPLICATION_JSON_UTF8) // Json으로 응답이 오길 바란다.
                    .content(jsonString))
                .andDo(print())
                .andExpect(status().isOk())
                .andExpect(jsonPath("$.id").value(2019)) // json 응답값 확인
                .andExpect(jsonPath("$.name").value("h232ch"));
    }


//    @Autowired
//    Marshaller marshaller;  // 안됨; 이유 찾아봐야함
//    XML 부분은 스킵함
WebMvcConfigurer (Spring Framework 5.2.9.RELEASE API)
docs.spring.io
● 핸들러 맵핑에 설정할 수 있는 인터셉터
● 핸들러를 실행하기 전, 후(아직 랜더링 전) 그리고 완료(랜더링까지 끝난 이후) 시점에 부가 작업을 하고 싶은 경우에 사용할 수 있다.
● 여러 핸들러에서 반복적으로 사용하는 코드를 줄이고 싶을 때 사용할 수 있다.
○ 로깅, 인증 체크, Locale 변경 등...
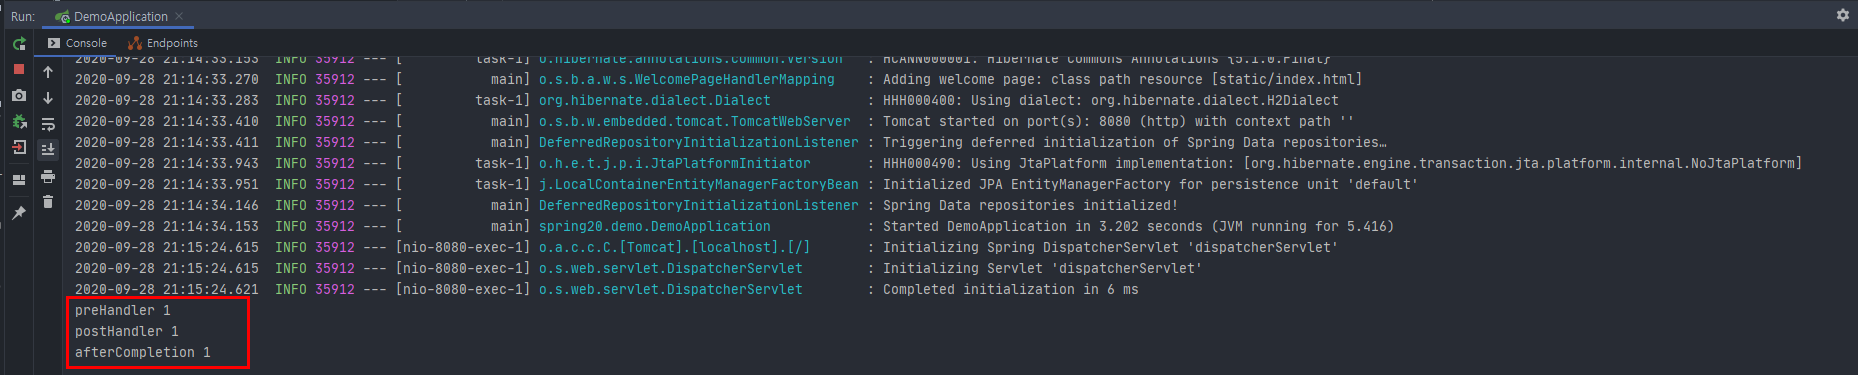
ㅇ boolean preHandle(request, response, handler )
● 핸들러 실행하기 전에 호출 됨
● “핸들러"에 대한 정보를 사용할 수 있기 때문에 서블릿 필터에 비해 보다 세밀한 로직을 구현할 수 있다.
● 리턴값으로 계속 다음 인터셉터 또는 핸들러로 요청,응답을 전달할지(true) 응답 처리가 이곳에서 끝났는지(false) 알린다.
ㅇ void postHandle(request, response, modelAndView)
● 핸들러 실행이 끝나고 아직 뷰를 랜더링 하기 이전에 호출 됨
● “뷰"에 전달할 추가적이거나 여러 핸들러에 공통적인 모델 정보를 담는데 사용할 수도 있다.
● 이 메소드는 인터셉터 역순으로 호출된다.
● 비동기적인 요청 처리 시에는 호출되지 않는다.
ㅇ void afterCompletion(request, response, handler, ex)
● 요청 처리가 완전히 끝난 뒤(뷰 랜더링 끝난 뒤)에 호출 됨
● preHandler에서 true를 리턴한 경우에만 호출 됨
● 이 메소드는 인터셉터 역순으로 호출된다.
● 비동기적인 요청 처리 시에는 호출되지 않는다.
ㅇ vs 서블릿 필터
● 서블릿 보다 구체적인 처리가 가능하다.
● 서블릿은 보다 일반적인 용도의 기능을 구현하는데 사용하는게 좋다.
16. 핸들러 인터셉터 2부: 만들고 등록하기
ㅇ 핸들러 인터셉터 구현하기
package spring20.demo;

import org.springframework.web.servlet.HandlerInterceptor;
import org.springframework.web.servlet.ModelAndView;

import javax.servlet.http.HttpServletRequest;
import javax.servlet.http.HttpServletResponse;

public class GreetingIntercepter implements HandlerInterceptor {
    @Override
    public boolean preHandle(HttpServletRequest request, HttpServletResponse response, Object handler) throws Exception {
        System.out.println("preHandler 1");
        return true; // false시 post, after로 안넘어감
    }

    @Override
    public void postHandle(HttpServletRequest request, HttpServletResponse response, Object handler, ModelAndView modelAndView) throws Exception {
        System.out.println("postHandler 1");
    }

    @Override
    public void afterCompletion(HttpServletRequest request, HttpServletResponse response, Object handler, Exception ex) throws Exception {
        System.out.println("afterCompletion 1");
    }

    // 핸들러 인터셉터 핸들러를 맵핑하기 전후 그리고 완료된 시점(요청 처리 전, 후, 뷰 렌더링 종료 후)에 부가 작업을 추가할 수 있다.
    // 핸들러에서 반복적으로 사용하는 코드를 줄이고 싶을 때 사용할 수 있음 (로깅, 인증 체크, 로케일 변경 등)

    // preHandle 1 : handler( hello 메서드 ) 제공, boolean 타입 리턴(true : 다음 인터셉터, false : 인터셉터 종료)
    // preHandle 2 :
    // 요청 처리
    // postHandle 2 : modelAndView 제공, modelAndView 커스티마이징 가능(Model에 추가정보 기입, 뷰 변경 등)
    // postHandle 1 : post, after의 경우 다중일 경우 역순으로 실행됨
    // 뷰 렌더링
    // afterCompletion 2 : 어떤 핸들러가 처리했는지, 예외 처리 발생시 어떤 예외인지 등의 확인 가능
    // afterCompletion 1 : post, after의 경우 다중일 경우 역순으로 실행됨
    // 서블릿 필터와 동일한 기능 -> 서블릿 필터보다 구체적이고 handler, modelAndView 등이 제공되어 스프링에서 구형이 용이함
    // 일반 적인 경우 -> 서블릿 필터 사용 , 스프링의 handler, modelandview등을 이용하는 경우 -> 핸들러 인터셉터 수행

    // XSS를 차단하는 경우 -> 서블릿 필터 이용 (네이버에서 LuxyXSS 라는 것을 제공하고 있음)

}
ㅇ 핸들러 인터셉터 등록하기
package spring20.demo;

import org.springframework.context.annotation.Bean;
import org.springframework.context.annotation.Configuration;
import org.springframework.format.FormatterRegistry;
import org.springframework.http.CacheControl;
import org.springframework.http.converter.HttpMessageConverter;
import org.springframework.oxm.jaxb.Jaxb2Marshaller;
import org.springframework.web.servlet.config.annotation.InterceptorRegistry;
import org.springframework.web.servlet.config.annotation.ResourceHandlerRegistry;
import org.springframework.web.servlet.config.annotation.ViewControllerRegistry;
import org.springframework.web.servlet.config.annotation.WebMvcConfigurer;

import java.util.List;
import java.util.concurrent.TimeUnit;

@Configuration
public class WebConfig implements WebMvcConfigurer { // Springboot WebMvc는 WebConfig 클래스의 설정값을 참조하여 서비스를 띄움

    @Override
    public void addInterceptors(InterceptorRegistry registry) {
        registry.addInterceptor(new GreetingIntercepter()).order(0); // order는 -일수록(낮을수록) 순서가 높다
        registry.addInterceptor(new AnotherIntercepter()) // 별도의 Order를 정하지 않으면 add된 순서대로 수행됨
                .addPathPatterns("/hi") // 인터셉터를 /hi에만 적용하고 싶다.
                .order(-1);
    }
}
● 특정 패턴에 해당하는 요청에만 적용할 수도 있다.
● 순서를 지정할 수 있다.
17. 리소스 핸들러 (정적 리소스를 다루는 방법)
ㅇ 이미지, 자바스크립트, CSS 그리고 HTML 파일과 같은 정적인 리소스를 처리하는 핸들러 등록하는 방법
ㅇ 디폴트(Default) 서블릿
● 서블릿 컨테이너가 기본으로 제공하는 서블릿으로 정적인 리소스를 처리할 때 사용한다.
tomcat.apache.org/tomcat-9.0-doc/default-servlet.html
ㅇ 스프링 MVC 리소스 핸들러 맵핑 등록
● 가장 낮은 우선 순위로 등록.
○ 다른 핸들러 맵핑이 “/” 이하 요청을 처리하도록 허용하고
○ 최종적으로 리소스 핸들러가 처리하도록.
● DefaultServletHandlerConfigurer
ㅇ 리소스 핸들러 설정
● 어떤 요청 패턴을 지원할 것인가
● 어디서 리소스를 찾을 것인가
● 캐싱
● ResourceResolver: 요청에 해당하는 리소스를 찾는 전략
○ 캐싱, 인코딩(gzip, brotli), WebJar, ...
● ResourceTransformer: 응답으로 보낼 리소스를 수정하는 전략
○ 캐싱, CSS 링크, HTML5 AppCache, ...
ㅇ 스프링 부트
● 기본 정적 리소스 핸들러와 캐싱 제공
www.slideshare.net/rstoya05/resource-handling-spring-framework-41
캐싱 동작방식 : Request Header에 If-Modified-Since 값에 날짜를 박아서 서버에 던지고
해당 날짜에서 변경이 발생했을 경우 새로운 컨텐츠를 요청하겠다는 의미이다.
반면 변경이 없는경우 캐싱된 데이터를 사용한다.
(이번 설정에서는 10분간 설정했으므로 변경이 없다라도 10분후에는 새로운 컨텐츠로 응답함)
WebConfig.java
@Configuration
public class WebConfig implements WebMvcConfigurer { // Springboot WebMvc는 WebConfig 클래스의 설정값을 참조하여 서비스를 띄움

    @Override
    public void addResourceHandlers(ResourceHandlerRegistry registry) { //
        registry.addResourceHandler("/mobile/**")
                .addResourceLocations("classpath:/mobile/") // file:c:/users/test/ 등의 파일시스템 기반으로 등록 가능
                .setCacheControl(CacheControl.maxAge(10, TimeUnit.MINUTES)); // 캐시 전략이 응답 해더에 추가되어 리소스가 변경되지 않았다면 10분간 캐싱함
    }

    @Override
    public void addViewControllers(ViewControllerRegistry registry) {
        registry.addViewController("/hiru").setViewName("hiru");  // 웹컨피크에서 핸들러를 직접 생성함 -> @GetMapping("/hiru") 와 동일
    }
}
18. HTTP 메시지 컨버터 1부: 개요
- Controller
@GetMapping("/message")
    public String message(@RequestBody String body){
        return body;
    }
위와 같은 코드가 있다면 /message 요청시 RequestBody로 받은 Content를 그대로 body로 지정하고
return body를 통해 html 응답으로 출력한다. 이렇게 입력받은 값을 응답바디로 컨버팅(엮순도 가능) 해주는 역할을 한다. 요청 본문에서 메시지를 읽어들이거나(@RequestBody), 응답 본문에 메시지를 작성할 때(@ResponseBody) 사용한다.
docs.spring.io/spring-framework/docs/current/javadoc-api/org/springframework/web/servlet/config/annotation/WebMvcConfigurer.html#configureMessageConverters-java.util.List-
docs.spring.io/spring-framework/docs/current/javadoc-api/org/springframework/web/servlet/config/annotation/WebMvcConfigurer.html#extendMessageConverters-java.util.List-
WebMvcConfigurer (Spring Framework 5.2.9.RELEASE API)
docs.spring.io
WebMvcConfigurer (Spring Framework 5.2.9.RELEASE API)
docs.spring.io
ㅇ HTTP 메시지 컨버터
● 요청 본문에서 메시지를 읽어들이거나(@RequestBody),
응답 본문에 메시지를 작성할 때(@ResponseBody) 사용한다.
ㅇ 기본 HTTP 메시지 컨버터
● 바이트 배열 컨버터
● 문자열 컨버터
● Resource 컨버터
● Form 컨버터 (폼 데이터 to/from MultiValueMap<String, String>)
ㅇ ()내용은 디펜던시가 있어야 동작하는 것들
● (JAXB2 컨버터)
● (Jackson2 컨버터) : json용
● (Jackson 컨버터) : json용
● (Gson 컨버터) : json용
● (Atom 컨버터)
● (RSS 컨버터)
ㅇ 설정 방법
● 기본으로 등록해주는 컨버터에 새로운 컨버터 추가하기: extendMessageConverters
● 기본으로 등록해주는 컨버터는 다 무시하고 새로 컨버터 설정하기: configureMessageConverters
(위 방법은 잘 사용 안함)
● 의존성 추가로 컨버터 등록하기 (추천)
○ 메이븐 또는 그래들 설정에 의존성을 추가하면 그에 따른 컨버터가 자동으로 등록 된다.
○ WebMvcConfigurationSupport
○ (이 기능 자체는 스프링 프레임워크의 기능, 스프링 부트 아님.)
www.baeldung.com/spring-httpmessageconverter-rest
Http Message Converters with the Spring Framework | Baeldung
How to configure HttpMessageConverters for a REST API with Spring, and how to use these converters with the RestTemplate.
www.baeldung.com
19. HTTP 메시지 컨버터 2부: JSON
ㅇ 스프링 부트를 사용하지 않는 경우
● 사용하고 싶은 JSON 라이브러리를 의존성으로 추가
● GSON
● JacksonJSON
● JacksonJSON 2
ㅇ 스프링 부트를 사용하는 경우
● 기본적으로 JacksonJSON 2가 의존성에 들어있다. Spring boot starter -> jackson을 가져옴
● 즉, JSON용 HTTP 메시지 컨버터가 기본으로 등록되어 있다.
● JSON path 문법
github.com/json-path/JsonPath
json-path/JsonPath
Java JsonPath implementation. Contribute to json-path/JsonPath development by creating an account on GitHub.
github.com
JSONPath Online Evaluator
JSONPath Online Evaluator
jsonpath.com
SimpleController.java
@GetMapping("/jsonMessage")
    public Person2 jsonMessage(@RequestBody Person2 person){
        return person;
    }
SimpleControllerTests.java
@Autowired
ObjectMapper objectMapper; // Jackson이 제공하는 ObjectMapper 객체를 Json 타입으로 변경해줌

    @Test
    public void jsonTest() throws Exception{

        Person2 person = new Person2();
        person.setId(2019l);
        person.setName("h232ch");
        String jsonString = objectMapper.writeValueAsString(person);

        this.mockMvc.perform(get("/jsonMessage")
                    .contentType(MediaType.APPLICATION_JSON_UTF8) // 본문에 Json을 담아서 보낼거고
                    .accept(MediaType.APPLICATION_JSON_UTF8) // Json으로 응답이 오길 바란다.
                    .content(jsonString))
                .andDo(print())
                .andExpect(status().isOk());
    }
20. 그밖에 WebMvcConfigurer 설정
docs.spring.io/spring-framework/docs/current/javadoc-api/org/springframework/web/servlet/config/annotation/WebMvcConfigurer.html
WebMvcConfigurer (Spring Framework 5.2.9.RELEASE API)
docs.spring.io
CORS 설정
● Cross Origin 요청 처리 설정
● 같은 도메인에서 온 요청이 아니더라도 처리를 허용하고 싶다면 설정한다.
리턴 값 핸들러 설정
● 스프링 MVC가 제공하는 기본 리턴 값 핸들러 이외에 리턴 핸들러를 추가하고 싶을 때 설정한다.
아큐먼트 리졸버 설정
● 스프링 MVC가 제공하는 기본 아규먼트 리졸버 이외에 커스텀한 아규먼트 리졸버를 추가하고 싶을 때 설정한다.
뷰 컨트롤러
● 단순하게 요청 URL을 특정 뷰로 연결하고 싶을 때 사용할 수 있다.
비동기 설정
● 비동기 요청 처리에 사용할 타임아웃이나 TaskExecutor를 설정할 수 있다.
뷰 리졸버 설정
● 핸들러에서 리턴하는 뷰 이름에 해당하는 문자열을 View 인스턴스로 바꿔줄 뷰 리졸버를 설정한다.
Content Negotiation 설정
● 요청 본문 또는 응답 본문을 어떤 (MIME) 타입으로 보내야 하는지 결정하는 전략을 설정한다.
21. 스프링 MVC 설정 마무리
직접 DispatcherServlet이 사용하는 빈을 등록하는 방법 : 스프링 MVC 설정은
즉 DispatcherServlet이 사용할 여러 빈 설정.
ㅇ HandlerMapper - HandlerAdapter - ViewResolver - ExceptionResolver - LocaleResolver - ... 일일히 등록하려니 너무 많고, 해당 빈들이 참조하는 또 다른 객체들까지 설정하려면... 설정할게 너무 많다.
ㅇ @EnableWebMvc : MVC 기본 설정 (스프링부트의 자동설정은 사용하지 못함)
(애노테이션 기반의 MVC용 설정이 이미 다 지정되어 있음 위의 빈들이 자동으로 등록)
- 애노테이션 기반의 스프링 MVC 설정 간편화
- WebMvcConfigurer가 제공하는 메소드를 구현하여 커스터마이징할 수 있다.
만약 WebMvcConfigurer의 구현체가 존재한다면 -> 설정값이 우선되도록 빈을 등록함
ㅇ 스프링 부트
- 스프링 부트 자동 설정을 통해 다양한 스프링 MVC 기능을 아무런 설정 파일을 만들지 않아도 제공한다.
- WebMvcConfigurer가 제공하는 메소드를 구현하여 커스터마이징할 수 있다.
- @EnableWebMvc를 사용하면 스프링 부트 자동 설정을 사용하지 못한다.
- 자동설정이란 : 타임리프, 제이손 지원, 정적 리소스 지원 등이다
ㅇ 스프링 MVC 설정 방법
- 스프링 부트를 사용하는 경우에는 application.properties 부터 시작.
- WebMvcConfigurer로 시작
- @Bean으로 MVC 구성 요소 직접 등록 (최후의 수단, 여기까지 갈 상황은 거의 없다)
22. 스프링 MVC 활용
ㅇ 스프링 MVC 핵심 기술 소개 : 스프링 MVC의 가장 핵심 기술인 Dispatcher Servlet이 요청을 받아서 요청 핸들러를 처리할 어댑터를 찾아 실행하는 환경에서 스프링 애노테이션 기반에서 어떻게 요청을 매핑하고 그 핸들러를 어떻게 작성하는지(파라메터를 쓰고 리턴하고 등등, 모델과 뷰를 사용하는 것)를 알아보는 것
ㅇ 애노테이션 기반의 스프링 MVC
● 요청 맵핑하기
● 핸들러 메소드
● 모델과 뷰
● 데이터 바인더 : 프로퍼티 에디터, 포메터, 컨버터를 설정할 수 있음
● 예외 처리 : 예외 발생시 예외는 어떻게 처리 가능한지?
● 글로벌 컨트롤러
ㅇ 사용할 기술
● 스프링 부트
● 스프링 프레임워크 웹 MVC
● 타임리프
ㅇ 학습 할 애노테이션
● @RequestMapping
○ @GetMapping, @PostMapping, @PutMapping, ...
● @ModelAttribute
● @RequestParam, @RequestHeader
● @PathVariable, @MatrixVariable
● @SessionAttribute, @RequestAttribute, @CookieValue
● @Valid
● @RequestBody, @ResponseBody
● @ExceptionHandler
● @ControllerAdvice
docs.spring.io/spring/docs/current/spring-framework-reference/web.html#mvc-controller
Web on Servlet Stack
Spring Web MVC is the original web framework built on the Servlet API and has been included in the Spring Framework from the very beginning. The formal name, “Spring Web MVC,” comes from the name of its source module (spring-webmvc), but it is more com
docs.spring.io
23. HTTP 요청 맵핑하기 1부: 요청 메소드
ㅇ 핸들러란? HTTP 요청을 처리할 수 있는 메서드 (보통 컨트롤러 역할을 함)
ㅇ HTTP Method
● GET, POST, PUT, PATCH, DELETE, ...
ㅇ GET 요청 :리소스를 요청할 때사용하며 캐싱이 가능함 -> 캐싱에 관련한 옵션을 헤더에 붙여서 보낼수 있음
● 클라이언트가 서버의 리소스를 요청할 때 사용한다.
● 캐싱 할 수 있다. (조건적인 GET으로 바뀔 수 있다.)
● 브라우저 기록에 남는다.
● 북마크 할 수 있다.
● 민감한 데이터를 보낼 때 사용하지 말 것. (URL에 다 보이니까)
● idempotent : 동일한 겟 요청에는 항상 동일한 겟 응답이 가야한다. (멱등)
ㅇ IfNotModifiedSince 등의 옵션 -> 304 응답을 보내어 캐싱처리 함 -> 클라이언트에 저장된 데이터를 그대로 씀
하지만 민감한 데이터는 캐싱하면 안됨
ㅇ POST 요청
● 클라이언트가 서버의 리소스를 수정하거나 새로 만들 때 사용한다.
● 서버에 보내는 데이터를 POST 요청 본문에 담는다.
● 캐시할 수 없다.
● 브라우저 기록에 남지 않는다.
● 북마크 할 수 없다.
● 데이터 길이 제한이 없다.
idempotent 하지 않음 -> 요청의 응닶이 다를수 있음
ㅇ PUT 요청 : POST와 차이는 POST의 경우 URI를 하나의 리소스로 보는게 아니라 내가 보내는 데이터를 처리하는 리소스로 지칭
ㅇ PUT의 경우 URI를 리소스 자체로 지칭
● URI에 해당하는 데이터를 새로 만들거나 수정할 때 사용한다.
● POST와 다른 점은 “URI”에 대한 의미가 다르다.
○ POST의 URI는 보내는 데이터를 처리할 리소스를 지칭하며
○ PUT의 URI는 보내는 데이터에 해당하는 리소스를 지칭한다. : 보내는 데이터로 해당 리소스를 만들거나 수정할 떄 사용하는 것
● Idempotent
ㅇ PATCH 요청
● PUT과 비슷하지만, 기존 엔티티와 새 데이터의 차이점만 보낸다는 차이가 있다.
● Idempotent
ㅇ DELETE 요청
● URI에 해당하는 리소스를 삭제할 때 사용한다.
● Idempotent
스프링 웹 MVC에서 HTTP method 맵핑하기
● @RequestMapping(method=RequestMethod.GET)
● @RequestMapping(method={RequestMethod.GET, RequestMethod.POST)
● @GetMapping, @PostMapping, ...
www.w3schools.com/tags/ref_httpmethods.asp
HTTP Methods GET vs POST
HTTP Request Methods What is HTTP? The Hypertext Transfer Protocol (HTTP) is designed to enable communications between clients and servers. HTTP works as a request-response protocol between a client and server. Example: A client (browser) sends an HTTP req
www.w3schools.com
tools.ietf.org/html/rfc2616#section-9.3
RFC 2616 - Hypertext Transfer Protocol -- HTTP/1.1
[Docs] [txt|pdf] [draft-ietf-http...] [Tracker] [Diff1] [Diff2] [Errata] Obsoleted by: 7230, 7231, 7232, 7233, 7234, 7235 DRAFT STANDARD Updated by: 2817, 5785, 6266, 6585 Errata Exist Network Working Group R. Fielding Request for Comments: 2616 UC Irvine
tools.ietf.org
RFC 2068 - Hypertext Transfer Protocol -- HTTP/1.1
[Docs] [txt|pdf] [draft-ietf-http...] [Tracker] [Diff1] [Diff2] Obsoleted by: 2616 PROPOSED STANDARD Network Working Group R. Fielding Request for Comments: 2068 UC Irvine Category: Standards Track J. Gettys J. Mogul DEC H. Frystyk T. Berners-Lee MIT/LCS J
tools.ietf.org
24. HTTP 요청 맵핑하기 2부: URI 패턴 맵핑
ㅇ URI, URL, URN 햇갈린다
stackoverflow.com/questions/176264/what-is-the-difference-between-a-uri-a-url-and-a-urn
What is the difference between a URI, a URL and a URN?
People talk about URLs, URIs, and URNs as if they're different things, but they look the same to the naked eye. What are the distinguishable differences between them?
stackoverflow.com
ㅇ 요청 식별자로 맵핑하기
● @RequestMapping은 다음의 패턴을 지원합니다.
● ?: 한 글자 (“/author/???” => “/author/123”)
● *: 여러 글자 (“/author/*” => “/author/keesun”)
● **: 여러 패스 (“/author/** => “/author/keesun/book”)
ㅇ 클래스에 선언한 @RequestMapping과 조합
● 클래스에 선언한 URI 패턴뒤에 이어 붙여서 맵핑합니다.
ㅇ 패턴이 중복되는 경우에는?
● 가장 구체적으로 맵핑되는 핸들러를 선택합니다.
ㅇ URI 확장자 맵핑 지원
● 이 기능은 권장하지 않습니다. (스프링 부트에서는 기본으로 이 기능을 사용하지 않도록 설정 해 줌)
○ 보안 이슈 (RFD Attack)
○ URI 변수, Path 매개변수, URI 인코딩을 사용할 때 할 때 불명확 함.
@RequestMapping({"/h232ch", "/h232ch.*") // URI 확장자 맵핑시 /h232ch.*를 암묵적으로 적용함 -> sh.zip, sh.json, sh.html 등등 모든 요청을 받아 보안 이슈가 발생함
    @ResponseBody
    public String h232ch(){
        return "h232ch hello";
    }
ㅇ RFD Attack
www.trustwave.com/en-us/resources/blogs/spiderlabs-blog/reflected-file-download-a-new-web-attack-vector/
Reflected File Download - A New Web Attack Vector
PLEASE NOTE: As promised, I've published a full white paper that is now available for download: White paper "Reflected File Download: A New Web Attack Vector" by Oren Hafif. On October 2014 as part of my talk at the Black...
www.trustwave.com
www.owasp.org/index.php/Reflected_File_Download
Reflected File Download - OWASP
This is an Attack. To view all attacks, please see the Attack Category page. Reflected File Download is an attack combining URL path segments (now deprecated) with pages that reflects user inputs in the response. Generally web services vulnerable to JSONP
wiki.owasp.org
pivotal.io/security/cve-2015-5211
CVE-2015-5211 RFD Attack in Spring Framework | Security
VMware Tanzu portfolio is a family of products and services for modernizing your applications and infrastructure to deliver better software to production.
tanzu.vmware.com
25. HTTP 요청 맵핑하기 3부: 미디어 타입 맵핑
특정한 타입의 데이터를 담고 있는 요청만 처리하는 핸들러
● @RequestMapping( consumes =MediaType.APPLICATION_JSON_UTF8_VALUE)
● Content-Type 헤더로 필터링
● 매치 되는 않는 경우에 415 Unsupported Media Type 응답
특정한 타입의 응답을 만드는 핸들러
● @RequestMapping( produces =”application/json”)
● Accept 헤더로 필터링 (하지만 살짝... 오묘함)
● 매치 되지 않는 경우에 406 Not Acceptable 응답
문자열을 입력하는 대신 MediaType을 사용하면 상수를 (IDE에서) 자동 완성으로 사용할 수 있다.
클래스에 선언한 @RequestMapping에 사용한 것과 조합이 되지 않고 메소드에 사용한 @RequestMapping의 설정으로 덮어쓴다. Not (!)을 사용해서 특정 미디어 타입이 아닌 경우로 맵핑 할 수도 있다.
26. HTTP 요청 맵핑하기 4부: 헤더와 매개변수
특정한 헤더가 있는 요청을 처리하고 싶은 경우
● @RequestMapping( headers = “key”)
특정한 헤더가 없는 요청을 처리하고 싶은 경우
● @RequestMapping( headers = “ ! key”)
특정한 헤더 키/값이 있는 요청을 처리하고 싶은 경우
● @RequestMapping( headers = “key=value”)
특정한 요청 매개변수 키를 가지고 있는 요청을 처리하고 싶은 경우
● @RequestMapping( params = “a”)
특정한 요청 매개변수가 없는 요청을 처리하고 싶은 경우
● @RequestMapping( params = “ ! a”)
특정한 요청 매개변수 키/값을 가지고 있는 요청을 처리하고 싶은 경우
● @RequestMapping( params = “a=b”)
26. HTTP 요청 맵핑하기 5부: HEAD와 OPTIONS 요청 처리
ㅇ 우리가 구현하지 않아도 스프링 웹 MVC에서 자동으로 처리하는 HTTP Method
● HEAD
● OPTIONS
ㅇ HEAD
● GET 요청과 동일하지만 응답 본문을 받아오지 않고 응답 헤더만 받아온다.
ㅇ OPTIONS
● 사용할 수 있는 HTTP Method 제공
● 서버 또는 특정 리소스가 제공하는 기능을 확인할 수 있다.
● 서버는 Allow 응답 헤더에 사용할 수 있는 HTTP Method 목록을 제공해야 한다.
27. HTTP 요청 맵핑하기 6부: 커스텀 애노테이션 (컴포스드 애노테이션)
ㅇ @RequestMapping 애노테이션을 메타 애노테이션으로 사용하기
● @GetMapping 같은 커스텀한 애노테이션을 만들 수 있다.
ㅇ 메타(Meta) 애노테이션 (애노테이션 위에 사용할 수 있는 애노테이션~!)
● 애노테이션에 사용할 수 있는 애노테이션
● 스프링이 제공하는 대부분의 애노테이션은 메타 애노테이션으로 사용할 수 있다.
ㅇ 조합(Composed) 애노테이션 (GetMapping의 경우 @RequestMapping, Documented 등의 애노테이션을 조합하여 만든 컴포스드 애노테이션이다.)
● 한개 혹은 여러 메타 애노테이션을 조합해서 만든 애노테이션
● 코드를 간결하게 줄일 수 있다.
● 보다 구체적인 의미를 부여할 수 있다.
ㅇ @Retention
● 해당 애노테이션 정보를 언제까지 유지할 것인가.
● Source: 소스 코드까지만 유지. 즉, 컴파일 하면 해당 애노테이션 정보는 사라진다는 이야기.
● Class: 컴파인 한 .class 파일에도 유지. 즉 런타임 시, 클래스를 메모리로 읽어오면 해당 정보는 사라진다.
● Runtime: 클래스를 메모리에 읽어왔을 때까지 유지! 코드에서 이 정보를 바탕으로 특정 로직을 실행할 수 있다.
ㅇ @Target
● 해당 애노테이션을 어디에 사용할 수 있는지 결정한다.
ㅇ @Documented
● 해당 애노테이션을 사용한 코드의 문서에 그 애노테이션에 대한 정보를 표기할지 결정한다.
ㅇ 메타 애노테이션
docs.spring.io/spring/docs/current/spring-framework-reference/core.html#beans-meta-annotations
Core Technologies
In the preceding scenario, using @Autowired works well and provides the desired modularity, but determining exactly where the autowired bean definitions are declared is still somewhat ambiguous. For example, as a developer looking at ServiceConfig, how do
docs.spring.io
AliasFor (Spring Framework 5.2.9.RELEASE API)
@AliasFor is an annotation that is used to declare aliases for annotation attributes. Usage Scenarios Explicit aliases within an annotation: within a single annotation, @AliasFor can be declared on a pair of attributes to signal that they are interchangeab
docs.spring.io
SampleController.java
package spring31.demo;


import org.springframework.http.HttpHeaders;
import org.springframework.http.MediaType;
import org.springframework.stereotype.Controller;
import org.springframework.web.bind.annotation.*;

@Controller
@RequestMapping(method = RequestMethod.GET) // 이렇게 설정할 경우 모든 핸들러에 Get 매핑을 적용하는 것과 같음
public class SampleController {


//    @RequestMapping("/hello") // 이 메서드만 사용시 hello 요청 -> hello 뷰로 전달
//    @RequestMapping(value = "/hello", method = RequestMethod.GET) // Get 요청만 받겠다
//    @RequestMapping(value = "/hello", method = {RequestMethod.GET, RequestMethod.PUT}) // Get, Put 요청만 받겠다
    @GetMapping // @RequestMapping(value = "/hello", method = RequestMethod.GET)와 동일
    // PostMapping, PutMapping, PatchMapping.. 많음
    @ResponseBody // 본문에 바로 응답한다.
    public String hello(){
        return "hello";
    }

    @RequestMapping(value = "/hello2") // 클래스 시작부에 @RquestMapping(method = RequestMethod.GET)이 이정되어있어 이 핸들러는 자동으로 GET 메서드를 사용한다
    public String hello2() {
        return "hello2";
    }

    @RequestMapping({"/hello3", "/hi"}) // hello와 hi의 URI를 매핑하여 두개를 동시에 사용 가능
    @ResponseBody
    public String hello3() {
        return "hello3";
    }

//    @RequestMapping("/hello/?") // hello 뒤 한글자의 문자를 받으면 처리
//    @RequestMapping("/hello/*") // 별이 하나만 있으면 한개의 패스만 매핑 /hello/test
    @RequestMapping("/hello/**") // 별두개가 있으면 뒤에 패스의 깊이와 상관없이 모두다 실행가능 /hello/test/etesttse/t/set/es/tes/
    @ResponseBody
    public String hello4() {
        return "hello4";
    }

    @RequestMapping("/hello/{name:[a-z]+}")
    @ResponseBody
    public String hello5(@PathVariable String name){ // @PathVariable /hello/ 뒤 값을 name으로 저장하겠다.
        return "hello " + name;
    }

    @RequestMapping("/h232ch")
    @ResponseBody
    public String h232ch(){
        return "h232ch hello";
    }

//    Json 요청만 처리하고 싶다면?
    @RequestMapping(value = "/hello10",
            consumes = MediaType.APPLICATION_JSON_VALUE, // 나는 json 요청만 처리하겠다~!
            produces = MediaType.TEXT_PLAIN_VALUE)  // 나는 Plain text로만 응답하겠다 즉 요청은 Json으로 받고 응답은 Plain으로 하겠다는 것
    @ResponseBody
    public String hello10(){
        return "hello";
    }

//    @RequestMapping(value = "/hello11", headers = HttpHeaders.FROM) // 헤더에 FROM 값이 있는 경우에만 응답
//    @RequestMapping(value = "/hello11", headers = "!" + HttpHeaders.FROM) // 헤더에 FROM 값이 없는 경우에 응답
//    @RequestMapping(value = "/hello11", headers = HttpHeaders.FROM + "=" + "111" ) // 헤더에 FROM 값이 111로 들어오는 경우
//    @RequestMapping(value = "/hello11", params = "name") // name이라는 파라메터가 있어야 함
    @RequestMapping(value = "/hello11", params = "name=h232ch") // name=sh232ch라는 파라메터가 있어야 함
    @ResponseBody
    public String hello11(){
        return "hello";
    }

    @GetMapping( "/hello12")
    @ResponseBody
    public String hello12(){
        return "hello";
    }

    @PostMapping("/hello12")
    @ResponseBody
    public String hello13(){
        return "hello";
    }

    @GetHelloMapping // 컴포스드 애노테이션을 생성(GetHelloMapping)하여 사용
    @ResponseBody
    public String hello20(){
        return "hello";
    }


}
GetHelloMapping(컴포스드 애노테이션)
package spring31.demo;

import org.springframework.web.bind.annotation.RequestMapping;
import org.springframework.web.bind.annotation.RequestMethod;

import java.lang.annotation.*;

@RequestMapping(method = RequestMethod.GET, value = "/hello20") // runtime : Java 코드를 컴파일하여 JVM으로 띄울때 어노테이션 정보는 사라짐
@Retention(RetentionPolicy.RUNTIME) // 해당 애노테이션 정보를 언제까지 유지할것인지? 기본값은 RetentionPolicy.Class(클래스를 클래스 로더가 로딩하는 순간 사라짐)
@Target({ElementType.METHOD}) // 이 애노테이션을 어디에 사용할 수 있는가? Http Method
@Documented // 이 애노테이션도 퍼블릭한 문서에 포함시김 -> 이 클래스를 사용한 쪽의 JAVADOC에 남는다
public @interface GetHelloMapping {

}
SampleControllerTests.java
package spring31.demo;

import org.junit.Test;
import org.junit.runner.RunWith;
import org.springframework.beans.factory.annotation.Autowired;
import org.springframework.boot.test.autoconfigure.web.servlet.WebMvcTest;
import org.springframework.http.HttpHeaders;
import org.springframework.http.MediaType;
import org.springframework.test.context.junit4.SpringRunner;
import org.springframework.test.web.servlet.MockMvc;

import static org.hamcrest.Matchers.containsString;
import static org.hamcrest.Matchers.hasItems;
import static org.springframework.test.web.servlet.request.MockMvcRequestBuilders.*;
import static org.springframework.test.web.servlet.result.MockMvcResultHandlers.print;
import static org.springframework.test.web.servlet.result.MockMvcResultMatchers.*;


@RunWith(SpringRunner.class) // Junit의 구현체로 테스트환경의 러너이다.
@WebMvcTest // 웹 MVC의 슬라이싱 테스트 애노테이션이며, Mock을 빈으로 등록해준다
public class SampleControllerTest {

    @Autowired
    MockMvc mockMvc;

    @Test
    public void helloTest() throws Exception {
        mockMvc.perform(get("/hello"))
                .andDo(print())
                .andExpect(status().isOk())
                .andExpect(content().string("hello"));
    }

    @Test
    public void helloTest2() throws Exception {
        mockMvc.perform(post("/hello"))
                .andDo(print())
                .andExpect(status().isOk())
                .andExpect(content().string("hello"));
    }

    @Test
    public void helloTest3() throws Exception {
        mockMvc.perform(delete("/hello"))
                .andDo(print())
                .andExpect(status().isMethodNotAllowed());
    }

    @Test
    public void helloTest4() throws Exception {
        mockMvc.perform(put("/hello"))
                .andDo(print())
                .andExpect(status().isMethodNotAllowed()); // 405 Request method 'PUT' not supported 메세지 발생 이유 : Get만 받도록 설정됨
                // RequestMapping(value="/hello", method=ReuqestMethod.GET)
//                .andExpect(status().isOk())
//                .andExpect(content().string("hello"));
    }


    @Test
    public void helloTest5() throws Exception {
        mockMvc.perform(get("/hello3"))
                .andExpect(status().isOk())
                .andExpect(content().string("hello3"));
    }

    @Test
    public void helloTest6() throws Exception {
        mockMvc.perform(get("/hi"))
                .andExpect(status().isOk())
                .andExpect(content().string("hello3"));
    }

    // hello와 hi 모두 등록됨

    @Test
    public void helloTest7() throws Exception {
        mockMvc.perform(get("/hello/a/dasf/adsf"))
                .andExpect(status().isOk())
                .andExpect(content().string("hello4"));
    }

    @Test
    public void helloTest8() throws Exception {
        mockMvc.perform(get("/hello/h232ch"))
                .andDo(print())
                .andExpect(status().isOk())
                .andExpect(content().string("hello h232ch"));
    }


    @Test // Json 요청 테스트
    public void helloTest10() throws Exception {
        mockMvc.perform(get("/hello10")
        .contentType(MediaType.APPLICATION_JSON_VALUE) // 요청하는 컨텐츠 타입은 Applicaton / Json이고
        .accept(MediaType.APPLICATION_JSON_VALUE)) // Application / Json으로 요청을 받고 싶다 (현재 Text로만 응답받는다고 설정되어 에러가 남)
                .andDo(print())
                .andExpect(status().isOk())
                .andExpect(content().string("hello"));
    }

    @Test
    public void helloTest11() throws Exception {
        mockMvc.perform(get("/hello11")
                .contentType(MediaType.APPLICATION_JSON_VALUE) //
                .header(HttpHeaders.FROM, "111")) // header에 키:밸류 값을 지정하여 전달할 수 있음, From : localhost 가 헤더에 들어감
                .andDo(print())
                .andExpect(status().isOk())
                .andExpect(content().string("hello"));
    }

    @Test
    public void helloTest12() throws Exception {
        mockMvc.perform(get("/hello11")
                .contentType(MediaType.APPLICATION_JSON_VALUE)) // 헤더에 From이 없기때문에 실패함
                .andDo(print())
                .andExpect(status().isOk())
                .andExpect(content().string("hello"));
    }

    @Test
    public void helloTest13() throws Exception {
        mockMvc.perform(get("/hello11")
                .contentType(MediaType.APPLICATION_JSON_VALUE)
                .param("name", "sh")) // Prameter를 추가함
                .andDo(print())
                .andExpect(status().isOk())
                .andExpect(content().string("hello"));
    }

    @Test
    public void helloTest14() throws Exception {
//        mockMvc.perform(head("/hello12")) // 헤더 정보를 리스폰스로 받는다.
        mockMvc.perform(options("/hello12")) // 사용 가능한 Http Method 목록을 받아온다.
                .andDo(print())
                .andExpect(status().isOk())
                .andExpect(header().exists(HttpHeaders.ALLOW)) // 헤더에 Allow 가 포함되어 있는지?
                .andExpect(header().stringValues(HttpHeaders.ALLOW,
                        hasItems(containsString("GET"),
                                containsString("POST"),
                                containsString("HEAD"),
                                containsString("OPTIONS")))); // 헤더에 GET, POST, HEAD, OPTIONS이 포함되어 있는가?

    }

    @Test
    public void hello20() throws Exception {
        mockMvc.perform(get("/hello20"))
                .andDo(print())
                .andExpect(status().isOk())
                .andExpect(content().string("hello"));
    }

}
28. 핸들러 메소드 1부: 지원하는 메소드 아규먼트와 리턴 타입
ㅇ 핸들러 메소드 아규먼트: 주로 요청 그 자체 또는 요청에 들어있는 정보를 받아오는데 사용한다.
ㅇ 핸들러 메소드 아규먼트 설명
WebRequest
NativeWebRequest
ServletRequest(Response)
HttpServletRequest(Response)
ㅇ 요청 또는 응답 자체에 접근 가능한 API
InputStream
Reader
OutputStream
Writer
ㅇ 요청 본문을 읽어오거나, 응답 본문을 쓸 때 사용할 수 있는 API
PushBuilder 스프링 5, HTTP/2 리소스 푸쉬에 사용
HttpMethod GET, POST, ... 등에 대한 정보
Locale TimeZone ZoneId
LocaleResolver가 분석한 요청의 Locale 정보
ㅇ @PathVariable URI 템플릿 변수 읽을 때 사용
ㅇ @MatrixVariable URI 경로 중에 키/값 쌍을 읽어 올 때 사용
ㅇ @RequestParam 서블릿 요청 매개변수 값을 선언한 메소드 아규먼트 타입으로
변환해준다. 단순 타입인 경우에 이 애노테이션을 생략할 수 있다.
ㅇ @RequestHeader 요청 헤더 값을 선언한 메소드 아규먼트 타입으로 변환해준다.
docs.spring.io/spring/docs/current/spring-framework-reference/web.html#mvc-ann-arguments
Web on Servlet Stack
Spring Web MVC is the original web framework built on the Servlet API and has been included in the Spring Framework from the very beginning. The formal name, “Spring Web MVC,” comes from the name of its source module (spring-webmvc), but it is more com
docs.spring.io
29. 핸들러 메소드 리턴: 주로 응답 또는 모델을 랜더링할 뷰에 대한 정보를 제공하는데 사용한다.
ㅇ @ResponseBody 리턴 값을 HttpMessageConverter를 사용해 응답 본문으로 사용한다.
ㅇ HttpEntity ReponseEntity
ㅇ 응답 본문 뿐 아니라 헤더 정보까지, 전체 응답을 만들 때 사용한다.
ㅇ String ViewResolver를 사용해서 뷰를 찾을 때 사용할 뷰 이름.
ㅇ View 암묵적인 모델 정보를 랜더링할 뷰 인스턴스
ㅇ Map Model
ㅇ (RequestToViewNameTranslator를 통해서) 암묵적으로 판단한 뷰 랜더링할 때 사용할 모델 정보
ㅇ @ModelAttribute (RequestToViewNameTranslator를 통해서) 암묵적으로 판단한
ㅇ 뷰 랜더링할 때 사용할 모델 정보에 추가한다. 이 애노테이션은 생략할 수 있다.
docs.spring.io/spring/docs/current/spring-framework-reference/web.html#mvc-ann-return-types
Web on Servlet Stack
Spring Web MVC is the original web framework built on the Servlet API and has been included in the Spring Framework from the very beginning. The formal name, “Spring Web MVC,” comes from the name of its source module (spring-webmvc), but it is more com
docs.spring.io
30. 핸들러 메소드 2부: URI 패턴
ㅇ @PathVariable
● 요청 URI 패턴의 일부를 핸들러 메소드 아규먼트로 받는 방법.
● 타입 변환 지원.
● (기본)값이 반드시 있어야 한다.
● Optional 지원.
ㅇ @MatrixVariable (키, 밸류쌍을 URI에 반영하는 형식 /event/1;name=h232ch)
● 요청 URI 패턴에서 키/값 쌍의 데이터를 메소드 아규먼트로 받는 방법
● 타입 변환 지원.
● (기본)값이 반드시 있어야 한다.
● Optional 지원.
● 이 기능은 기본적으로 비활성화 되어 있음. 활성화 하려면 다음과 같이 설정해야 함.
@Configuration public class WebConfig implements WebMvcConfigurer {
@Override public void configurePathMatch(PathMatchConfigurer configurer) {
UrlPathHelper urlPathHelper = new UrlPathHelper(); urlPathHelper.setRemoveSemicolonContent( false );
configurer.setUrlPathHelper(urlPathHelper); } }
docs.spring.io/spring/docs/current/spring-framework-reference/web.html#mvc-ann-typeconversion
Web on Servlet Stack
Spring Web MVC is the original web framework built on the Servlet API and has been included in the Spring Framework from the very beginning. The formal name, “Spring Web MVC,” comes from the name of its source module (spring-webmvc), but it is more com
docs.spring.io
docs.spring.io/spring/docs/current/spring-framework-reference/web.html#mvc-ann-matrix-variables
Web on Servlet Stack
Spring Web MVC is the original web framework built on the Servlet API and has been included in the Spring Framework from the very beginning. The formal name, “Spring Web MVC,” comes from the name of its source module (spring-webmvc), but it is more com
docs.spring.io
31. 핸들러 메소드 3부: @RequestMapping
ㅇ @RequestParam
● 요청 매개변수에 들어있는 단순 타입 데이터를 메소드 아규먼트로 받아올 수 있다.
● 값이 반드시 있어야 한다.
○ required=false 또는 Optional을 사용해서 부가적인 값으로 설정할 수도 있다.
● String이 아닌 값들은 타입 컨버전을 지원한다.
● Map<String, String> 또는 MultiValueMap<String, String>에 사용해서 모든 요청 매개변수를 받아 올 수도 있다.
● 이 애노테이션은 생략 할 수 잇다.
ㅇ 요청 매개변수란?
● 쿼리 매개변수
● 폼 데이터
docs.spring.io/spring/docs/current/spring-framework-reference/web.html#mvc-ann-requestparam
Web on Servlet Stack
Spring Web MVC is the original web framework built on the Servlet API and has been included in the Spring Framework from the very beginning. The formal name, “Spring Web MVC,” comes from the name of its source module (spring-webmvc), but it is more com
docs.spring.io
EventController.java
@Controller
public class EventController {

    @GetMapping({"/events", "/events/"})
    @ResponseBody
    public String event1(HttpServletRequest request, HttpServletResponse response){

        return "events";
    }

    @PostMapping({"/events", "/events/"})
    @ResponseBody
    public String event2(){
        return "events";
    }

        @GetMapping("/events/{id}") // 입력받는 값은 String이지만 @PathVariable Integer id에는 Integer 값으로 변환하여 들어감
    @ResponseBody
//    public Event getEvent(@PathVariable Integer id){
    public Event getEvent(@PathVariable("id") Integer idValue){ // 만약 @PathVariable id와 {id}값을 달리하면 이와같이 설정
        Event event = new Event();
        event.setId(idValue);
        return event;
    }

    @PostMapping(value = {"/events", "/events/"},
                consumes = MediaType.APPLICATION_JSON_VALUE,
                produces = MediaType.APPLICATION_JSON_VALUE)
    @ResponseBody
    public String event4(){
        return "events";
    }

    @PostMapping("/events")
    @ResponseBody
    public Event setEvent(@RequestParam String name, @RequestParam Integer limit){ // Require 값이 기본 True로 설정됨 (값이 무조건 있어야 한다는 의미)
        Event event = new Event();
        event.setName(name);
        event.setLimit(limit);
        return event;
    }

    @PostMapping("/events1")
    @ResponseBody
    public Event setEvent1(@RequestParam Map<String, String> params){ // 리쿼스트 파라메터를 맵에 저장하고 꺼내오는 방식
        Event event = new Event();
        event.setName(params.get("name"));
        return event;
    }

    @GetMapping("/events/form")
    public String eventForm(Model model) {
        Event newEvent = new Event();
        newEvent.setLimit(50);
        model.addAttribute("event", newEvent); // Model에 Event 객체를 넣어준다.
        return "/events/form"; //Model을 담아 /events/form 뷰로 넘겨준다.
    }

    @PostMapping("/events")
    @ResponseBody
    public Event getEvent(@RequestParam String name,
                          @RequestParam Integer limit) {
        Event event = new Event();
        event.setName(name);
        event.setLimit(limit);
        return event;
    }


    --

    @PostMapping("/events")
    @ResponseBody
//    public Event getEvent2(@Valid @ModelAttribute Event event, BindingResult bindingResult) {  // BindingResult의 경우 Event 객체 내의 값을 지정할 때 발생하는 에러의 예외 처리를 해줌
    public Event getEvent2(@Validated(Event.ValidateName.class) @ModelAttribute Event event, BindingResult bindingResult) {  // BindingResult의 경우 Event 객체 내의 값을 지정할 때 발생하는 에러의 예외 처리를 해줌
        // Event Limit 상위에 @Min(0) -> 0보다 커야함의 검증값을 주고 @Valid 애노테이션을 사용해 검증을 수행한다
        if(bindingResult.hasErrors()){
            System.out.println("======================");
            bindingResult.getAllErrors().forEach( //getAllErrors 리스트에 담긴 값을 c로 빼고 모두 출력
                    c -> {
                        System.out.println(c.toString());
                    }
            );
            System.out.println("======================");
        }
        return event; // Event 객체의 변수를 받아와서 event에 넣어주고 return함
    }

    @PostMapping("/events/name/{name}")
    @ResponseBody
//    public Event getEvent20(@Validated @ModelAttribute Event event, BindingResult bindingResult){
    public Event getEvent20(@Validated(Event.ValidateLimit.class) @ModelAttribute Event event, BindingResult bindingResult){

        if(bindingResult.hasErrors()){
            System.out.println("================");
            bindingResult.getAllErrors().forEach(c -> {
                System.out.println(c.toString());
            });
        }
        return event;
    }
Event.java
package spring31.demo;

import org.springframework.format.annotation.DateTimeFormat;

import javax.validation.constraints.Min;
import javax.validation.constraints.NotBlank;
import java.time.LocalDate;

public class Event {

    interface ValidateLimit {}
    interface ValidateName {}

    private Integer id;
//    @NotBlank(groups = ValidateName.class)
    @NotBlank()
    private String name;

//    @Min(value = 0, groups = ValidateLimit.class)
    @Min(0)
    private Integer limit;

    @DateTimeFormat(iso = DateTimeFormat.ISO.DATE) // 내가 받고싶음 포멧을 지정 yyyy-MM-DD
    private LocalDate startDate;

    public LocalDate getStartDate() {
        return startDate;
    }

    public void setStartDate(LocalDate startDate) {
        this.startDate = startDate;
    }

    public Integer getLimit() {
        return limit;
    }

    public void setLimit(Integer limit) {
        this.limit = limit;
    }

    public Integer getId() {
        return id;
    }

    public void setId(Integer id) {
        this.id = id;
    }

    public String getName() {
        return name;
    }

    public void setName(String name) {
        this.name = name;
    }
}
EventControllerTests.java
@RunWith(SpringRunner.class)
@WebMvcTest
public class EventControllerTest {

    @Autowired
    MockMvc mockMvc;

    @Test
    public void event1() throws Exception {
//        mockMvc.perform(get("/events"))
        mockMvc.perform(get("/templates/events/3"))
                .andDo(print())
                .andExpect(status().isOk());
    }

    @Test
    public void event2() throws Exception {
//        mockMvc.perform(get("/events"))
        mockMvc.perform(get("/templates/events/3"))
                .andDo(print())
                .andExpect(status().isOk());
    }

    @Test
    public void event3() throws Exception {
        mockMvc.perform(post("/templates/events")
                .contentType(MediaType.APPLICATION_JSON_VALUE) // Json 형태로 요청
                .accept(MediaType.APPLICATION_JSON_VALUE))  // Json 형태로 응답
                .andDo(print())
                .andExpect(status().isOk());
    }

    @Test
    public void getEvent() throws Exception{
        mockMvc.perform(get("/templates/events/1"))
                .andDo(print())
                .andExpect(status().isOk())
                .andExpect(jsonPath("id").value(1));
    }

    @Test
    public void setEvent() throws Exception{
        mockMvc.perform(post("/templates/events"))
                .andDo(print())
                .andExpect(status().isOk())
                .andExpect(jsonPath("name").value("h232ch"));
    }
32. 핸들러 메소드 4부: 폼 서브밋 (타임리프)
ㅇ 폼을 보여줄 요청 처리
● GET /events/form
● 뷰: events/form.html
● 모델: “event”, new Event()
타임리프
● @{}: URL 표현식
● ${}: variable 표현식
● *{}: selection 표현식
www.thymeleaf.org/doc/articles/standarddialect5minutes.html
Getting started with the Standard dialects in 5 minutes - Thymeleaf
Getting started with the Standard dialects in 5 minutes This guide will take you through some of the most important concepts you need to know to understand a Thymeleaf template written in the Standard or SpringStandard dialects. It is not a substitute for
www.thymeleaf.org
Download Postman | Try Postman for Free
Try Postman for free! Join 11 million developers who rely on Postman, the collaboration platform for API development. Create better APIs—faster.
www.postman.com
33. 핸들러 메소드 5부: @ModelAttribute
@ModelAttribute : RequestParam처럼 요청에 들어있는 데이터를 받아오는 방법 중 하나임 단
ModelAttribute는 단일 객체(int num, String name 등)가 아닌 복합 객체(Event event 등)를 받아온다.
● 여러 곳에 있는 단순 타입 데이터를 복합 타입 객체로 받아오거나 해당 객체를 새로 만들 때 사용할 수 있다.
● 여러 곳? URI 패스, 요청 매개변수, 세션 등
● 생략 가능
값을 바인딩 할 수 없는 경우에는?
● BindException 발생 400 에러
바인딩 에러를 직접 다루고 싶은 경우
● BindingResult 타입의 아규먼트를 바로 오른쪽에 추가한다.
바인딩 이후에 검증 작업을 추가로 하고 싶은 경우
● @Valid 또는 @Validated 애노테이션을 사용한다.
Web on Servlet Stack
Spring Web MVC is the original web framework built on the Servlet API and has been included in the Spring Framework from the very beginning. The formal name, “Spring Web MVC,” comes from the name of its source module (spring-webmvc), but it is more com
docs.spring.io
34. 핸들러 메소드 6부: @Validated
스프링 MVC 핸들러 메소드 아규먼트에 사용할 수 있으며 validation group이라는 힌트를 사용할 수 있다.
@Valid 애노테이션에는 그룹을 지정할 방법이 없다.
@Validated는 스프링이 제공하는 애노테이션으로 그룹 클래스를 설정할 수 있다.
ㅇ 의존성 추가 필요 : spring-boot-starter-validation
35. 핸들러 메소드 7부: 폼 서브밋 (에러 처리)
바인딩 에러 발생 시 Model에 담기는 정보
● Event
● BindingResult.event
ㅇ 타임리프 사용시 바인딩 에러 보여주기
www.thymeleaf.org/doc/tutorials/2.1/thymeleafspring.html#field-errors
Tutorial: Thymeleaf + Spring
Preface This tutorial explains how Thymeleaf can be integrated with the Spring Framework, especially (but not only) Spring MVC. Note that Thymeleaf has integrations for both versions 3.x and 4.x of the Spring Framework, provided by two separate libraries c
www.thymeleaf.org
<p th:if="${#fields.hasErrors('limit')}" th:errors="*{limit}">Incorrect date</p>
ㅇ Post / Redirect / Get 패턴
en.wikipedia.org/wiki/Post/Redirect/Get
Post/Redirect/Get - Wikipedia
Diagram of a double POST problem encountered in user agents. Diagram of the double POST problem above being solved by PRG. Post/Redirect/Get (PRG) is a web development design pattern that lets the page shown after a form submission be reloaded, shared, or
en.wikipedia.org
Post 이후에 브라우저를 리프래시 하더라도 폼 서브밋이 발생하지 않도록 하는 패턴
36. 핸들러 메소드 8부: @SessionAttributes
ㅇ 모델 정보를 HTTP 세션에 저장해주는 애노테이션
● HttpSession을 직접 사용할 수도 있지만
● 이 애노테이션에 설정한 이름에 해당하는 모델 정보를 자동으로 세션에 넣어준다.
● @ModelAttribute는 세션에 있는 데이터도 바인딩한다.
● 여러 화면(또는 요청)에서 사용해야 하는 객체를 공유할 때 사용한다. (장바구니, 여러 화면에 걸쳐서 만들어야 하는 경우 -> 폼을 여러개로 하여 입력받는 경우 세션을 유지하여 값을 유지해야 함)
@SessionAttributes("event") // HttpSession httpSession, httpSession.setAttriute("event",newEvent)를 전체 다 적용함
@SessionAttributes("event")의 의미는 Event event 객체를 각 핸들러 세션값에 넣어줌을 의미함 -> 이로써 각 핸들러에서는 하나의 세션에 입력된 event를 확인할 수 있음
ㅇ SessionStatus를 사용해서 세션 처리 완료를 알려줄 수 있다.
● 폼 처리 끝나고 세션을 비울 때 사용한다.
37. 핸들러 메소드 9부: 멀티 폼 서브밋
ㅇ 세션을 사용해서 여러 폼에 걸쳐 데이터를 나눠 입력 받고 저장하기
● 이벤트 이름 입력받고
● 이벤트 제한 인원 입력받고
● 서브밋 -> 이벤트 목록으로!
ㅇ 완료된 경우에 세션에서 모델 객체 제거하기
● SessionStatus
38. 핸들러 메소드 10부: @SessionAttribute (SessionAttributes와 다름!)
ㅇ HTTP 세션에 들어있는 값 참조할 때 사용
● HttpSession을 사용할 때 비해 타입 컨버전을 자동으로 지원하기 때문에 조금 편리함.
● HTTP 세션에 데이터를 넣고 빼고 싶은 경우에는 HttpSession을 사용할 것.
@SessionAttributes와는 다르다.
● @SessionAttributes는 해당 컨트롤러 내에서만 동작.
○ 즉, 해당 컨트롤러 안에서 다루는 특정 모델 객체를 세션에 넣고 공유할 때 사용.
● @SessionAttribute는 컨트롤러 밖(인터셉터 또는 필터 등)에서 만들어 준 세션 데이터에 접근할 때 사용한다.
39. 핸들러 메소드 11부: RedirectAttributes
리다이렉트 할 때 기본적으로 Model에 들어있는 primitive type 데이터는 URI 쿼리 매개변수에 추가된다.
● 스프링 부트에서는 이 기능이 기본적으로 비활성화 되어 있다.
● Ignore-default-model-on-redirect 프로퍼티를 사용해서 활성화 할 수 있다.
Primitive Type - Number, BigInt(ES6 추가), String, Boolean, null, undefined, Symbol(ES6 추가)
Reference Type - Object(array, function, map, set, weakmap, weakset(ES6 추가))
원하는 값만 리다이렉트 할 때 전달하고 싶다면 RedirectAttributes에 명시적으로 추가할 수 있다.
리다이렉트 요청을 처리하는 곳에서 쿼리 매개변수를 @RequestParam 또는 @ModelAttribute로 받을 수 있다.
40. 핸들러 메소드 12부: Flash Attributes
주로 리다이렉트시에 데이터를 전달할 때 사용한다.
● 데이터가 URI에 노출되지 않는다.
● 임의의 객체를 저장할 수 있다.
● 보통 HTTP 세션을 사용한다.
리다이렉트 하기 전에 데이터를 HTTP 세션에 저장하고 리다이렉트 요청을 처리 한 다음 그 즉시 제거한다.
RedirectAttributes를 통해 사용할 수 있다.
XPath
www.w3schools.com/xml/xpath_syntax.asp
XPath Syntax
XPath Syntax XPath uses path expressions to select nodes or node-sets in an XML document. The node is selected by following a path or steps. The XML Example Document We will use the following XML document in the examples below.
www.w3schools.com
www.freeformatter.com/xpath-tester.html#ad-output
Free Online XPath Tester / Evaluator - FreeFormatter.com
XPath Tester / Evaluator Allows you to test your XPath expressions/queries against a XML file. This tool runs better than other existing XPath online tools as it supports most of the XPath functions (string(), number(), name(), string-length() etc.) and do
www.freeformatter.com
41. 핸들러 메소드 13부: MultipartFile
MultipartFile
● 파일 업로드시 사용하는 메소드 아규먼트
● MultipartResolver 빈이 설정 되어 있어야 사용할 수 있다. (스프링 부트 자동 설정이 해 줌)
● POST multipart/form-data 요청에 들어있는 파일을 참조할 수 있다.
● List<MultipartFile> 아큐먼트로 여러 파일을 참조할 수도 있다.
파일 업로드 폼
<form method="POST" enctype="multipart/form-data" action="#" th:action="@{/file}">
File: <input type="file" name="file"/> <input type="submit" value="Upload"/> </form>
파일 업로드 처리 핸들러
FileController.java (test.jpg 위치 : reources/)
package spring31.demo;

import org.apache.tika.Tika;
import org.springframework.beans.factory.annotation.Autowired;
import org.springframework.core.io.Resource;
import org.springframework.core.io.ResourceLoader;
import org.springframework.http.HttpHeaders;
import org.springframework.http.ResponseEntity;
import org.springframework.stereotype.Controller;
import org.springframework.ui.Model;
import org.springframework.web.bind.annotation.*;
import org.springframework.web.multipart.MultipartFile;
import org.springframework.web.servlet.mvc.support.RedirectAttributes;

import java.io.File;
import java.io.IOException;

@Controller
public class FileController {

    @Autowired
    private ResourceLoader resourceLoader;

    @GetMapping("/file")
    public String fileUploadForm(Model model){ //RedirectAttribut 객체는 Model에 자동으로 담긴다.
        return "files/index";
    }

    @PostMapping("/file")
    public String fileUpload(@RequestParam MultipartFile file, // 요청에서 파일을 받는다.
                             RedirectAttributes redirectAttributes){
        // save 어딘가에 저장해야함 -> 상세한 내용은 찾아봐야함
        System.out.println("file name: "+file.getName());
        System.out.println("file original name: "+file.getOriginalFilename());
        String message = file.getOriginalFilename() + " is uploaded";
        redirectAttributes.addFlashAttribute("message",message);
        return "redirect:file";
    }


    @GetMapping("/file/{filename}")
    public ResponseEntity<Resource> fileDownload(@PathVariable String filename) throws IOException {
        // ResponseEntity<Resource>를 응답값으로 설정시 Return에 http response를 직접 만들어서 응답할 수 있음
        // 응답코드, 헤더, 바디 정보 순으로 기재하고 return시 Body에 Resource를 넣었는데 이는 String 등의 형태로 바꾸어서 넣을수 있음
        // filename을 PathVariable로 가저와서 filename에 넣어줌
        Resource resource = resourceLoader.getResource("classpath:" + filename); // classpath = Resource 디렉토리 아래
        //Resource 로더는 classpath 아래의 resource를 가져와서 객체에 넣는다.
        File file = resource.getFile();
        // 파일 객체에 Resource.getFile()로 가져온 파일을 넣는다.

        Tika tika = new Tika();
        String mediaType = tika.detect(file); // Tika는 응답 파일형태를 자동으로 detect하는 기능의 라이브러리이다.

        return ResponseEntity.ok()
                .header(HttpHeaders.CONTENT_DISPOSITION, "attachment; filename=\"" + resource.getFilename() + "\"") // 파일다운로드시 이름입력
                .header(HttpHeaders.CONTENT_TYPE, mediaType) // ContentType은 Tika객체를 이용한다.
                .header(HttpHeaders.CONTENT_LENGTH, file.length() + "") // ContentLenght를 알려준다.
                .body(resource); // 바디에 파일을 담아서 보낸다.
    }
}
ㅇ 메시지 출력
files/index.html
<!DOCTYPE html>
<html lang="en" xmlns:th="http://www.thymeleaf.org">
<head>
    <meta charset="UTF-8">
    <title>Title</title>
</head>
<body>
<div th:if="${message}">
    <h2 th:text="${message}"></h2>
</div>
<form method="POST" enctype="multipart/form-data" action="#" th:action="@{/file}">
    File: <input type="file" name="file"/> <input type="submit" value="Upload"/> </form>
</body>
</html>
ㅇ 파일 업로드 관련 스프링 부트 설정
● MultipartAutoConfiguration
● MultipartProperties
docs.spring.io/spring/docs/current/spring-framework-reference/web.html#mvc-multipart-forms
Web on Servlet Stack
Spring Web MVC is the original web framework built on the Servlet API and has been included in the Spring Framework from the very beginning. The formal name, “Spring Web MVC,” comes from the name of its source module (spring-webmvc), but it is more com
docs.spring.io
spring.io/guides/gs/uploading-files/
Uploading Files
this guide is designed to get you productive as quickly as possible and using the latest Spring project releases and techniques as recommended by the Spring team
spring.io
42. 핸들러 메소드 14부: ResponseEntity
ㅇ 파일 리소스를 읽어오는 방법
● 스프링 ResourceLoader 사용하기
ㅇ 파일 다운로드 응답 헤더에 설정할 내용
● Content-Disposition: 사용자가 해당 파일을 받을 때 사용할 파일 이름
● Content-Type: 어떤 파일인가
● Content-Length: 얼마나 큰 파일인가
ㅇ 파일의 종류(미디어 타입) 알아내는 방법
tika.apache.org/
Apache Tika – Apache Tika
Apache Tika - a content analysis toolkit The Apache Tika™ toolkit detects and extracts metadata and text from over a thousand different file types (such as PPT, XLS, and PDF). All of these file types can be parsed through a single interface, making Tika
tika.apache.org
ㅇ ResponseEntity
● 응답 상태 코드
● 응답 헤더
● 응답 본문
@GetMapping("/file/{filename}")
@ResponseBody
public ResponseEntity<Resource> downloadFile(@PathVariable String filename) throws IOException {
Resource resource = resourceLoader.getResource("classpath:" + filename); File file = resource.getFile(); Tika tika = new Tika(); String type = tika.detect(file);
return ResponseEntity.ok()
		.header(HttpHeaders.CONTENT_DISPOSITION, "attachement; filename=\"" + resource.getFilename() + "\"")
		.header(HttpHeaders.CONTENT_TYPE, type).header(HttpHeaders.CONTENT_LENGTH, String.valueOf(file.length())).body(resource); }
spring.io/guides/gs/uploading-files/
Uploading Files
this guide is designed to get you productive as quickly as possible and using the latest Spring project releases and techniques as recommended by the Spring team
spring.io
developer.mozilla.org/en-US/docs/Web/HTTP/Headers/Content-Disposition
Content-Disposition
In a regular HTTP response, the Content-Disposition response header is a header indicating if the content is expected to be displayed inline in the browser, that is, as a Web page or as part of a Web page, or as an attachment, that is downloaded and saved
developer.mozilla.org
www.baeldung.com/java-file-mime-type
Getting a File's Mime Type in Java | Baeldung
An overview of various ways to get a file's MIME type
www.baeldung.com
43. 핸들러 메소드 15부: @RequestBody & HttpEntity
@RequestBody
● 요청 본문(body)에 들어있는 데이터를 HttpMessageConveter를 통해 변환한 객체로 받아올 수 있다.
● @Valid 또는 @Validated를 사용해서 값을 검증 할 수 있다.
● BindingResult 아규먼트를 사용해 코드로 바인딩 또는 검증 에러를 확인할 수 있다.
HttpMessageConverter
● 스프링 MVC 설정 (WebMvcConfigurer)에서 설정할 수 있다.
● configureMessageConverters: 기본 메시지 컨버터 대체
● extendMessageConverters: 메시지 컨버터에 추가
● 기본 컨버터
○ WebMvcConfigurationSupport.addDefaultHttpMessageConverters
HttpEntity
● @RequestBody와 비슷하지만 추가적으로 요청 헤더 정보를 사용할 수 있다.
docs.spring.io/spring/docs/current/spring-framework-reference/web.html#mvc-ann-requestbody
Web on Servlet Stack
Spring Web MVC is the original web framework built on the Servlet API and has been included in the Spring Framework from the very beginning. The formal name, “Spring Web MVC,” comes from the name of its source module (spring-webmvc), but it is more com
docs.spring.io
docs.spring.io/spring/docs/current/spring-framework-reference/web.html#mvc-ann-httpentity
Web on Servlet Stack
Spring Web MVC is the original web framework built on the Servlet API and has been included in the Spring Framework from the very beginning. The formal name, “Spring Web MVC,” comes from the name of its source module (spring-webmvc), but it is more com
docs.spring.io
44. 핸들러 메소드 16부: @ResponseBody & ResponseEntity
ㅇ @ResponseBody
● 데이터를 HttpMessageConverter를 사용해 응답 본문 메시지로 보낼 때 사용한다.
● @RestController 사용시 자동으로 모든 핸들러 메소드에 적용 된다.
ㅇ ResponseEntity
● 응답 헤더 상태 코드 본문을 직접 다루고 싶은 경우에 사용한다.
docs.spring.io/spring/docs/current/spring-framework-reference/web.html#mvc-ann-responsebody
Web on Servlet Stack
Spring Web MVC is the original web framework built on the Servlet API and has been included in the Spring Framework from the very beginning. The formal name, “Spring Web MVC,” comes from the name of its source module (spring-webmvc), but it is more com
docs.spring.io
docs.spring.io/spring/docs/current/spring-framework-reference/web.html#mvc-ann-responseentity
Web on Servlet Stack
Spring Web MVC is the original web framework built on the Servlet API and has been included in the Spring Framework from the very beginning. The formal name, “Spring Web MVC,” comes from the name of its source module (spring-webmvc), but it is more com
docs.spring.io
EventController.java
package spring31.demo;

import com.sun.org.apache.xpath.internal.operations.Mod;
import org.springframework.beans.factory.annotation.Autowired;
import org.springframework.http.MediaType;
import org.springframework.http.ResponseEntity;
import org.springframework.stereotype.Controller;
import org.springframework.ui.Model;
import org.springframework.validation.BindingResult;
import org.springframework.validation.annotation.Validated;
import org.springframework.web.bind.WebDataBinder;
import org.springframework.web.bind.annotation.*;
import org.springframework.web.bind.support.SessionStatus;
import org.springframework.web.context.request.NativeWebRequest;
import org.springframework.web.context.request.WebRequest;
import org.springframework.web.servlet.mvc.support.RedirectAttributes;

import javax.servlet.http.HttpServletRequest;
import javax.servlet.http.HttpServletResponse;
import javax.servlet.http.HttpSession;
import javax.validation.Valid;
import java.lang.reflect.Array;
import java.time.LocalDateTime;
import java.util.ArrayList;
import java.util.List;
import java.util.Map;

@Controller
@SessionAttributes("event") // HttpSession httpSession,  httpSession.setAttriute("event",newEvent)를 전체 다 적용함
// 해당 클래스 안에서만 event라고 하는 객체를 세션에 넣어구며 SessionStatus를 사용하여 세션을 정리할 수 있음
// 만약 해당 클래스(컨트롤러) 밖에서 세션에 넣어준 데이터를 사용하고자 할 때는 SessionAttribute를 사용할 수 있음
public class EventController {


//    @ExceptionHandler
//    public String runtimeErrorHandler(RuntimeException e, Model model){
//
//        model.addAttribute("message", "runtime Error");
//        return "error";
//
//    }

    @Autowired
    EventValidator2 eventValidator2; // 밸리데이션 빈으로 주입받기


//    @ModelAttribute
//    public List<String> categories2(Model model){
//        List<String> list = new ArrayList<>();
//        list.add("Study");
//        list.add("seminar");
//        list.add("hobby");
//        list.add("social");
//        return list;
//    }

//    @GetMapping({"/events", "/events/"})
//    @ResponseBody
//    public String event1(HttpServletRequest request, HttpServletResponse response){
//
//        return "events";
//    }
//
//    @PostMapping({"/events", "/events/"})
//    @ResponseBody
//    public String event2(){
//        return "events";
//    }
//
//    @GetMapping("/events/{id}") // 입력받는 값은 String이지만 @PathVariable Integer id에는 Integer 값으로 변환하여 들어감
//    @ResponseBody
////    public Event getEvent(@PathVariable Integer id){
//    public Event getEvent(@PathVariable("id") Integer idValue){ // 만약 @PathVariable id와 {id}값을 달리하면 이와같이 설정
//        Event event = new Event();
//        event.setId(idValue);
//        return event;
//    }
//
//    @PostMapping(value = {"/events", "/events/"},
//                consumes = MediaType.APPLICATION_JSON_VALUE,
//                produces = MediaType.APPLICATION_JSON_VALUE)
//    @ResponseBody
//    public String event4(){
//        return "events";
//    }
//
//    @PostMapping("/events")
//    @ResponseBody
//    public Event setEvent(@RequestParam String name, @RequestParam Integer limit){ // Require 값이 기본 True로 설정됨 (값이 무조건 있어야 한다는 의미)
//        Event event = new Event();
//        event.setName(name);
//        event.setLimit(limit);
//        return event;
//    }
//
//    @PostMapping("/events1")
//    @ResponseBody
//    public Event setEvent1(@RequestParam Map<String, String> params){ // 리쿼스트 파라메터를 맵에 저장하고 꺼내오는 방식
//        Event event = new Event();
//        event.setName(params.get("name"));
//        return event;
//    }
//
//    @GetMapping("/events/form")
//    public String eventForm(Model model) {
//        Event newEvent = new Event();
//        newEvent.setLimit(50);
//        model.addAttribute("event", newEvent); // Model에 Event 객체를 넣어준다.
//        return "/events/form"; //Model을 담아 /events/form 뷰로 넘겨준다.
//    }
//
//    @PostMapping("/events")
//    @ResponseBody
//    public Event getEvent(@RequestParam String name,
//                          @RequestParam Integer limit) {
//        Event event = new Event();
//        event.setName(name);
//        event.setLimit(limit);
//        return event;
//    }


    //-----

//    @PostMapping("/events")
//    @ResponseBody
////    public Event getEvent2(@Valid @ModelAttribute Event event, BindingResult bindingResult) {  // BindingResult의 경우 Event 객체 내의 값을 지정할 때 발생하는 에러의 예외 처리를 해줌
//    public Event getEvent2(@Validated(Event.ValidateName.class) @ModelAttribute Event event, BindingResult bindingResult) {  // BindingResult의 경우 Event 객체 내의 값을 지정할 때 발생하는 에러의 예외 처리를 해줌
//        // Event Limit 상위에 @Min(0) -> 0보다 커야함의 검증값을 주고 @Valid 애노테이션을 사용해 검증을 수행한다
//        if(bindingResult.hasErrors()){
//            System.out.println("======================");
//            bindingResult.getAllErrors().forEach( //getAllErrors 리스트에 담긴 값을 c로 빼고 모두 출력
//                    c -> {
//                        System.out.println(c.toString());
//                    }
//            );
//            System.out.println("======================");
//        }
//        return event; // Event 객체의 변수를 받아와서 event에 넣어주고 return함
//    }
//
//    @PostMapping("/events/name/{name}")
//    @ResponseBody
////    public Event getEvent20(@Validated @ModelAttribute Event event, BindingResult bindingResult){
//    public Event getEvent20(@Validated(Event.ValidateLimit.class) @ModelAttribute Event event, BindingResult bindingResult){
//
//        if(bindingResult.hasErrors()){
//            System.out.println("================");
//            bindingResult.getAllErrors().forEach(c -> {
//                System.out.println(c.toString());
//            });
//        }
//        return event;
//    }


    @GetMapping("/events/form")
    public String eventForm(Model model){// HttpSession httpSession){ // 세션을 사용함
        Event event = new Event();
        event.setLimit(50);
        model.addAttribute("event", event);

//        httpSession.setAttribute("event", event); // 세션에 객체를 넣어둠
        return "/events/form";
    }

    @PostMapping("/events")
    public String setEvents(@Validated @ModelAttribute Event event,
                            BindingResult bindingResult,
                            Model model,
                            SessionStatus sessionStatus){
        if(bindingResult.hasErrors()){
            return "/events/form";
        }
        sessionStatus.setComplete(); // 폼저리를 끝내고 세션을 비울 때 사용
//        List<Event> eventList = new ArrayList<>(); // event 객체를 받아서 eventList에 담아줌
//        eventList.add(event);
//        model.addAttribute("eventList",eventList); // 원래는 DB에 값을 Save하는 게 들어와야 함 -> redirect 테스트를 위해 주석처리
        return "redirect:/events/list"; // eventList의 모델 정보를 가지고 View를 보여줌
        // redirect prefix를 사용하면 아래 GetMapping으로 리다이렉트를 해줌
    }


    @GetMapping("/events/list")
    public String getEvents(@ModelAttribute Event event, Model model,
                            @SessionAttribute LocalDateTime visitTime,
                            SessionStatus sessionStatus){ // @SessionAttribute로 가져오는 방법

        System.out.println(visitTime); // 인터셉트로 등록되어 Session에 저장되어있는 visitTime을 localDateTime 객체로 바인딩하여 sout함
//        Event event = new Event();
//        event.setName("h232ch");
//        event.setLimit(10); // DB에서 불러와야하는데 목킹으로 대체한 코드

        List<Event> eventList = new ArrayList<>();
        eventList.add(event);
        model.addAttribute(eventList);
        sessionStatus.setComplete();
        return "/events/list";
    }


    @GetMapping("/events/list2")
    public String getEvents2(Model model,
//                            @SessionAttribute LocalDateTime visitTime){ // @SessionAttribute로 가져오는 방법
                            HttpSession httpSession){

//        System.out.println(visitTime); // 인터셉트로 등록되어 Session에 저장되어있는 visitTime을 localDateTime 객체로 바인딩하여 sout함
        System.out.println(httpSession.getAttribute("visitTime")); // HttpSession으로 가져오는 방법 (어찌되었든 세션에있는 값을 꺼내오면 됨)
        Event event = new Event();
        event.setName("h232ch");
        event.setLimit(10); // DB에서 불러와야하는데 목킹으로 대체한 코드

        List<Event> eventList = new ArrayList<>();
        eventList.add(event);
        model.addAttribute(eventList);
//        sessionStatus.setComplete();
        return "/events/list";
    }

    @GetMapping("/events/form/name")
    public String eventsFormName(Model model){
        throw new EventException(); // Exception 핸들러로 보냄 -> @ExceptionHandler 애노테이션존재하는 핸들러
//
//        model.addAttribute("event", new Event()); // 여기서 저장하는 이벤트 객체는 Session에 들어가고, 해당 모델 객체를 form-name 뷰에서 사용할것임
//        return "/events/form-name"; // form-name에서 이름 객체를 변경하여 Event에 저장하고 Post로 /events/form/name으로 보내면
//        // PostMapping의 ModelAttribute가 Event를 바인딩하여 에러가 없다면 /events/list로 리다이렉션하여 보여줌
    }

    @GetMapping("/events/form/name2")
    @ModelAttribute // 리턴객체 Event를 Model에 담아줌, 이 애노테이션은 생략 가능
    // ViewName은 RequestToViewNameTranslater라는 인터페이스가 요청과 일치하는 ViewName과 일치하는 것으로 알려줌 /events/form/name2.html 을 가르킬것임
    public Event eventsFormName2(){
        return new Event();
    }

    @PostMapping("/events/form/name")
    public String eventsFormNameSubmit(@Validated @ModelAttribute
                                                   Event event, // ModelAttribute는 Session에 저장된 Event를 바인딩하여 /events/form/limit에 전달
                                                    BindingResult bindingResult){
        if(bindingResult.hasErrors()){
            return "/events/form-name";
        }

        eventValidator2.validate(event, bindingResult); // 명시적으로 특정 시점에 밸리데이션도 가능하다 (빈으로 등록한 경우)
        // bindingResult는 Error 하위에 존재하여 인자로 받을 수 있음
        return "redirect:/events/form/limit";
    }

    @GetMapping("/events/form/limit")
    public String eventFormLimit(@ModelAttribute Event event,
                                                Model model){ //ModelAttribute는 Session에 저장된 Event를 바인딩함
        model.addAttribute("event", event); // ModelAttribute는 세션에 저장된 event를 가져오고 model은 이 event를 그대로 모델에 저장한다.
        return "/events/form-limit"; // limit에 먼저 들어가면 오류가 발생하는데 그 이유는 Event 모델이 존재하지 않기 때문이다.
    }

    @PostMapping("/events/form/limit")
    public String eventsFormLimitSubmit(@Validated @ModelAttribute Event event, // ModelAttribute는 Session에 저장된 Event를 바인딩하여 /events/list로 보내고
                                        BindingResult bindingResult, // Events 리스트는 해당 Model객체를 ArrayList에 저장하여 보여줌
                                        SessionStatus sessionStatus, // 이로써 멀티폼에 걸쳐서 데이터를 생성해야 할 때 @SessionAttributes를 사용할 수 있음
//                                        Model model){  // redirect 주소로 url 파라메터 값을 보낼때 사용
                                        RedirectAttributes redirectAttributes){  // redirect 주소로 일부의 값만 url 파라메터로 보낼때 사용
        if(bindingResult.hasErrors()){
            return "/events/form-limit";
        }

//        model.addAttribute("name", event.getName()); // application.properties에 옵션을 조정하여 해당 model 추가시 redrect 주소에 url 파라메터를 보내게됨
//        model.addAttribute("limit",event.getLimit()); // 해당 방법은 모델에 추가되는 전체 데이터가 전송되는 것이며 일부데이터만 보낼때는 RedirectAttribute를 사용하면 됨
//        redirectAttributes.addAttribute("name",event.getName());
//        redirectAttributes.addAttribute("limit",event.getLimit()); // 위와 다르게 각각의 Attribute를 정하여 보낼수 있음
        // 받는쪽에서는 @RequestParam(프리미티브 타입) 혹은 @ModelAttribute(레퍼런스 타입)으로 받을 수 있음

        // RedirectAttribute.addAttribute 방식은 URL 파라메터에 프리미티브 타입으로 추가되는 것이고 FlashAttribute의 경우 레퍼런스 타입으로 추가되는 방식이다.
        redirectAttributes.addFlashAttribute("newEvent", event); // newEvent 객체는 세션에 들어가며, redirect 한곳으로 데이터가 보내지고 이후 사라진다. // 1회성 데이터, 그래서 flash
        // 세션을 통해 전달되는 데이터로서 url에 표현되지 않음

        sessionStatus.setComplete();
        return "redirect:/events/list3";
    }

    @GetMapping("/events/list3")
    public String getEvents3(Model model, SessionStatus sessionStatus, // FlashAttribute의 경우 Model 내에 FlashAttribute가 이미 존재하여 사실 ModelAttribute를 사용하지 않아도 됨
//                             @RequestParam String name,
//                             @RequestParam Integer limit){ // 받는쪽에서는 @RequestParam(프리미티브 타입) 혹은 @ModelAttribute(레퍼런스 타입)으로 받을 수 있음
                             @ModelAttribute("newEvent") Event event,
                             @SessionAttribute LocalDateTime visitTime){ // ModelAttribute로 받아올 떄 사용, 기본적으로 ModelAttribute는 Session에서 객체를 찾아옴
                            // 하지만 현제 limit 핸들러에서 sessionStauts.setComplete한 상태로 세션에 아무것도 없는 상태로
                            // 오류가 발생하지만 ("event2")라는 이름을 명시해주면 limit에서 보내오는 쿼리파라메터에서 값을 참조함
                            // ModelAttribute는 SessionAttributes가 설정한 event를 찾음 하지만 명시적으로 newEvent를 적었기 떄문에
                            // ModelAttribute는 Session에서 객체를 참조하지 않고 쿼리 파라메터의 값을 참조함

//        Event newEvent = new Event(); // RequestPram으로 받아올때 사용
//        newEvent.setName(name);
//        newEvent.setLimit(limit);
        System.out.println(visitTime);

        Event newEvent = new Event();
        newEvent.setName("test");
        newEvent.setLimit(15);

        List<Event> events = new ArrayList<>();
        events.add(newEvent);
        events.add(event);
        model.addAttribute(events);

        sessionStatus.setComplete();
        return "/events/list";
    }


}
Event.java
package spring31.demo;

import org.springframework.format.annotation.DateTimeFormat;

import javax.validation.constraints.Min;
import javax.validation.constraints.NotBlank;
import java.time.LocalDate;

public class Event {

    interface ValidateLimit {}
    interface ValidateName {}

    private Integer id;
//    @NotBlank(groups = ValidateName.class)
    @NotBlank()
    private String name;

//    @Min(value = 0, groups = ValidateLimit.class)
    @Min(0)
    private Integer limit;

    @DateTimeFormat(iso = DateTimeFormat.ISO.DATE) // 내가 받고싶음 포멧을 지정 yyyy-MM-DD
    private LocalDate startDate;

    public LocalDate getStartDate() {
        return startDate;
    }

    public void setStartDate(LocalDate startDate) {
        this.startDate = startDate;
    }

    public Integer getLimit() {
        return limit;
    }

    public void setLimit(Integer limit) {
        this.limit = limit;
    }

    public Integer getId() {
        return id;
    }

    public void setId(Integer id) {
        this.id = id;
    }

    public String getName() {
        return name;
    }

    public void setName(String name) {
        this.name = name;
    }
}
EventApi.java
package spring31.demo;


import org.springframework.http.HttpEntity;
import org.springframework.http.MediaType;
import org.springframework.http.ResponseEntity;
import org.springframework.validation.BindingResult;
import org.springframework.web.bind.annotation.*;

import javax.validation.Valid;

@RestController
public class EventApi {

    @ExceptionHandler
    public ResponseEntity errorHandler(){
        return ResponseEntity.badRequest().body("can't create event as ...");
    }

    @PostMapping("/api/events")
    public Event createdEvent(@RequestBody Event event){ // 요청 본문에 있는 데이터를 Event 타입으로 컨버전한다.
        // 요청 헤더에 컨텐츠 타입이 들어있으며 본문의 내용의 타입에 따라 가령 json이라면 json을 컨버전 할수있는 HandlerAdapter를 찾아서 연결해줌
        // 스프링 부트의 경우 Jackson2(json을 처리하는) 오브젝트 매퍼가 기본적으로 들어있음
        // save event

        return event;
    }

    @PostMapping("/api/events2") // 요청 본문에 있는 데이터를 Event 타입으로 컨버전한다. HttpEntity를 활용한 방법, 헤더정보 등에 접근 가능
    public Event createEvent2(HttpEntity<Event> request){ // 본문의 바디를 Event 객체로 컨버팅해줌
        //save.. event,,
        MediaType contentType = request.getHeaders().getContentType();
        System.out.println(contentType);
        return request.getBody(); //
    }

    @PostMapping("/api/events3") //
    public Event createEvent3(@RequestBody @Valid Event event,
                              BindingResult bindingResult){ //
        //save.. event,,

        if(bindingResult.hasErrors()){
            bindingResult.getAllErrors().forEach(error -> {
                System.out.println(error);
            });
        }
        return event;
    }

    @PostMapping("/api/events4")
    @ResponseBody // 메서드에서 리턴하는 값을 httpMessageConverter를 사용하여 응답값에 담아줌, RestContrlloer를 적용한 경우 모든 핸들러에 ResponseBody가 붙어있음
    public Event createEvent4(@RequestBody @Valid Event event, // RequestBody는 요청값을 Event 객체로 변환해줌
                              BindingResult bindingResult){ //
        // Save.. event,,

        if(bindingResult.hasErrors()){
            bindingResult.getAllErrors().forEach(error -> {
                System.out.println(error);
            });
        }
        return event;
    }

    @PostMapping("/api/events5")
    public ResponseEntity<Event> createEvent5(@RequestBody @Valid Event event, // 리턴 타입을 ResponseEntity로 받음 -> ResponseEntity응답시 http 헤더, 바디 등을 닮아서 응답 가능
                                       BindingResult bindingResult){
        // Save.. event,,

        if(bindingResult.hasErrors()){
            return ResponseEntity.badRequest().build(); // 유형에 따라 Build를 해줘야 하는 것이 존재
        }

        return ResponseEntity.ok(event);
    }

}
EventValidator.java
package spring31.demo;

import org.springframework.validation.Errors;
import org.springframework.validation.Validator;

public class EventValidator implements Validator {

    @Override
    public boolean supports(Class<?> aClass) { // 어떤 도메인 클래스에 밸리데이션을 지원할까?
        return Event.class.isAssignableFrom(aClass); // 이벤트 클래스를 밸리데이션할때 사용
    }

    @Override
    public void validate(Object o, Errors errors) {
        Event event = (Event)o;
        if (event.getName().equalsIgnoreCase("aaa")){ // aaa라는 문자열이 name으로 들어오는것을 거부하겠다.
            errors.rejectValue("name", "wrongValue", "the value is not allowed");
        }
    }
}
EventValidator2.java
package spring31.demo;

import org.springframework.stereotype.Component;
import org.springframework.validation.Errors;
import org.springframework.validation.Validator;

@Component // 밸리데이션을 빈으로 주입받는 방식
public class EventValidator2{

    public void validate(Event event, Errors errors) { // BindingResult 상위에 Errors가 존재함
        if (event.getName().equalsIgnoreCase("aaa")){ // aaa라는 문자열이 name으로 들어오는것을 거부하겠다.
            errors.rejectValue("name", "wrongValue", "the value is not allowed");
        }
    }
}
VistTimeInterceptor.java
package spring31.demo;

import org.springframework.web.servlet.HandlerInterceptor;

import javax.servlet.http.HttpServletRequest;
import javax.servlet.http.HttpServletResponse;
import javax.servlet.http.HttpSession;
import java.time.LocalDateTime;

public class VisitTimeInterceptor implements HandlerInterceptor { // 인터셉트 구현


    @Override
    public boolean preHandle(HttpServletRequest request, HttpServletResponse response, Object handler) throws Exception {
        // session이 생성되면 VisitTime값을 찾고 없으면 만듦 (현재 세션이 계속 끊기는 상황으로 요청마다 매 새로운 세션이 생성되어 시간을 찍을것임)

        HttpSession session = request.getSession();
        if(session.getAttribute("visitTime") == null){
            session.setAttribute("visitTime", LocalDateTime.now());
        }

        return true; // 다음인터셉터, 핸들러까지 처리됨 (true)
    }
}
BaseController.java (전역 컨트롤러)
package spring31.demo;

import org.springframework.ui.Model;
import org.springframework.web.bind.WebDataBinder;
import org.springframework.web.bind.annotation.*;

import java.util.ArrayList;
import java.util.List;

@ControllerAdvice(assignableTypes = {EventController.class, EventApi.class}) // 전역 컨트롤러가 됨 (class를 지정하지 않으면 전체적용 그렇지않으면 선택한 클래스에 적용)
//@RestControllerAdvice // 리턴값이 응닶본문이 되는 구조임
public class BaseController { // 이렇게 정의한 아래의 내용이 컨트롤러 전역에 적용됨

    // 아래의 코드는 각 컨트롤러에 직접 정의해도 됨

    @ExceptionHandler({EventException.class, RuntimeException.class}) // EventException, RuntimeException 모두 여기에서 처리함
    public String eventErrorHandler(EventException e, Model model){

        model.addAttribute("message", "event error");
        return "error";

    }

    @InitBinder("event") // 이름을 명시(event)하게 되면 명시된 객체를 바인딩받을때만 동작하는것이다.
    public void initEventBinder(WebDataBinder webDataBinder){
        webDataBinder.setDisallowedFields("id"); // 블랙리스트 방식 , 받고싶지않은 필드값을 걸러냄 (ID를 폼에서 보내도 걸러냄) -> ID를 입력해도 이벤트에 받지않음 (ID 값이 Null이 됨)
//        webDataBinder.setAllowedFields("id", "name"); // 화이트리스트 방식
        // 커스텀한 밸리데이션, JSR 303 애노테이션이 지원하는 밸리데이션과 다름
        webDataBinder.addValidators(new EventValidator());// 이름 값에 특정한 값(aaa)이 들어오는것을 막고싶다.

    }

    @ModelAttribute
    public void categories(Model model){
        List<String> list = new ArrayList<>();
        list.add("Study");
        list.add("seminar");
        list.add("hobby");
        list.add("social");
        model.addAttribute("categories", list);
    }

}
45. 예외 처리 핸들러: @ExceptionHandler
ㅇ 특정 예외가 발생한 요청을 처리하는 핸들러 정의
● 지원하는 메소드 아규먼트 (해당 예외 객체, 핸들러 객체, ...)
● 지원하는 리턴 값
● REST API의 경우 응답 본문에 에러에 대한 정보를 담아주고,
상태 코드를 설정하려면 ResponseEntity를 주로 사용한다.
docs.spring.io/spring/docs/current/spring-framework-reference/web.html#mvc-ann-exceptionhandler
Web on Servlet Stack
Spring Web MVC is the original web framework built on the Servlet API and has been included in the Spring Framework from the very beginning. The formal name, “Spring Web MVC,” comes from the name of its source module (spring-webmvc), but it is more com
docs.spring.io
EventException.java
package spring31.demo;

public class EventException extends RuntimeException{
}
EventController.java
@GetMapping("/events/form/name")
    public String eventsFormName(Model model){
        throw new EventException(); // Exception 핸들러로 보냄 -> @ExceptionHandler 애노테이션존재하는 핸들러
    }
46. 전역 컨트롤러: @(Rest)ControllerAdvice
예외 처리, 바인딩 설정, 모델 객체를 모든 컨트롤러 전반에 걸쳐 적용하고 싶은 경우에 사용한다.
● @ExceptionHandler
● @InitBinder
● @ModelAttributes
적용할 범위를 지정할 수도 있다.
● 특정 애노테이션을 가지고 있는 컨트롤러에만 적용하기
● 특정 패키지 이하의 컨트롤러에만 적용하기
● 특정 클래스 타입에만 적용하기
docs.spring.io/spring/docs/current/spring-framework-reference/web.html#mvc-ann-controller-advice
Web on Servlet Stack
Spring Web MVC is the original web framework built on the Servlet API and has been included in the Spring Framework from the very beginning. The formal name, “Spring Web MVC,” comes from the name of its source module (spring-webmvc), but it is more com
docs.spring.io
'4. Backend Development > 1. Spring Framework' 카테고리의 다른 글
| 7. Spring boot (0) | 2020.09.24 |
|---|---|
| 6. DispatcherServlet (0) | 2020.09.01 |
| 5. Servlet (0) | 2020.09.01 |
| 4. MacOS Security Management System (0) | 2020.07.21 |
| 3. Spring Framework 기반 웹 프로젝트 (0) | 2020.06.09 |


댓글